Archive for the ‘WPF’ Category.

Using Aspect Oriented Programming to implement INotifyPropertyChanged as an attribute

Using Aspect Oriented Programming, specifically PostSharp, they have implemented INotifyPropertyChanged in two ways:

  1. A simple single INotifyPropertyChanged aspect as described here: http://www.sharpcrafters.com/solutions/notifypropertychanged
  2. The Definitive INotifyPropertyChanged which can be found here: http://www.sharpcrafters.com/blog/category/Toolkits.aspx

I recommend you look at both of those methods and see if they meet your needs. Of they do use them.

I didn’t find either implementation to my liking. The first is too simple, and the second is too complex. Both seem to think that I am going to want all my properties to kick off the OnPropertyChanged event. They both implement the class as follows.

[NotifyPropertyChanged]
public class Person
{
    public int Id { get; set; }

    public string FirstName { get; set; }

    public string LastName { get; set; }
}

All three properties will implement INotifyPropertyChanged even though it may be that Id never changes or if it does change, there is no need to notify anything.

NotifyPropertyChanged Attribute Expectations

Here is how I want to use Aspect Oriented Programming in my MVVM objects.

// This adds the interface and the OnNotifyPropertyChanged method.
[NotifyPropertyChangedClass]
public class Person
{
    // Does NOT call OnNotifyPropertyChanged
    public int Id { get; set; }

    // Calls OnNotifyPropertyChanged
    [NotifyPropertyChanged]
    public string FirstName { get; set; }

    // Calls OnNotifyPropertyChanged
    [NotifyPropertyChanged]
    public string LastName { get; set; }
}

Now, I also want to be able to specify the notifying of a property changed:

[NotifyPropertyChangedClass]
public class Person
{
    // Does NOT call OnNotifyPropertyChanged
    public int Id { get; set; }

    // Calls OnNotifyPropertyChanged for the property and the string params passed in.
    [NotifyPropertyChanged("LastCommaFirst", "FirstLast")]
    public string FirstName { get; set; }

    // Calls OnNotifyPropertyChanged
    [NotifyPropertyChanged]
    public string LastName { get; set; }

    public string LastCommaFirst
    {
        get { return string.Format("{1}, {0}", FirstName, LastName); }
    }

    public string FirstLast
    {
        get { return string.Format("{1}, {0}", FirstName, LastName); }
    }
}

Aspect MVVM

I was able to implement this with three very simple files: 1 interface, and two aspects. Here is how I implemented this:

The first file, INotifyPropertyChangedWithMethod.cs, is an interface that inherits from INotifyPropertyChanged. I used this to get access to the OnPropertyChanged event method.

using System.ComponentModel;

namespace MVVM
{
    public interface INotifyPropertyChangedWithMethod : INotifyPropertyChanged
    {
        void OnPropertyChanged(string propertyName);
    }
}

The second object is basically the same as the simple single INotifyPropertyChanged aspect, except it only implements the interface and does nothing to the setters.

using System;
using System.ComponentModel;
using PostSharp.Aspects;
using PostSharp.Aspects.Advices;
using PostSharp.Extensibility;
using PostSharp.Reflection;

namespace MVVM
{
    [Serializable]
    [IntroduceInterface(typeof(INotifyPropertyChangedWithMethod), OverrideAction = InterfaceOverrideAction.Ignore)]
    [MulticastAttributeUsage(MulticastTargets.Class, Inheritance = MulticastInheritance.Strict)]
    public sealed class NotifyPropertyChangedClassAttribute : InstanceLevelAspect, INotifyPropertyChangedWithMethod
    {

        [ImportMember("OnPropertyChanged", IsRequired = false, Order = ImportMemberOrder.AfterIntroductions)]
        public Action OnPropertyChangedMethod;

        [IntroduceMember(Visibility = Visibility.Family, IsVirtual = true, OverrideAction = MemberOverrideAction.Ignore)]
        public void OnPropertyChanged(string propertyName)
        {
            if (this.PropertyChanged != null)
            {
                PropertyChanged(Instance, new PropertyChangedEventArgs(propertyName));
            }
        }

        [IntroduceMember(OverrideAction = MemberOverrideAction.Ignore)]
        public event PropertyChangedEventHandler PropertyChanged;
    }
}

The final aspect is one that I use on the properties.

using System;
using PostSharp.Aspects;

namespace MVVM
{
    [Serializable]
    public class NotifyPropertyChanged : LocationInterceptionAspect
    {
        public NotifyPropertyChanged()
            : this(true, null)
        {
        }

        public NotifyPropertyChanged(params string[] inProperty)
            : this(true, inProperty)
        {
        }

        public NotifyPropertyChanged(bool inNotifyCurrentProperty, params string[] inProperty)
        {
            _NotifyCurrentProperty = inNotifyCurrentProperty;
            _OtherProperties = inProperty;
        }

        private readonly string[] _OtherProperties;
        private readonly bool _NotifyCurrentProperty;

        public override void OnSetValue(LocationInterceptionArgs args)
        {
            // Do nothing if the property value doesn't change
            if (args.Value == args.GetCurrentValue())
                return;

            args.ProceedSetValue();

            var npc = args.Instance as INotifyPropertyChangedWithMethod;
            if (npc != null)
            {

                // Notify for current property
                if (_NotifyCurrentProperty)
                    npc.OnPropertyChanged(args.Location.PropertyInfo.Name);

                // Notify for other properties
                if (_OtherProperties != null)
                {
                    foreach (string otherProperty in _OtherProperties)
                    {
                        npc.OnPropertyChanged(otherProperty);
                    }
                }
            }
        }
    }
}

My MVVM objects still include RelayCommand, but they no longer need ObservableObject or ViewModelBase.

Differences Encountered using Aspect MVVM

Calling OnPropertyChanged or Adding to the PropertyChanged event

First, since the classes themselves don’t actually have code for INotifyPropertyChanged or the OnPropertyChanged method, what do you do if you need to actually call OnPropertyChanged in one of the classes methods instead of in a property? What if you need to add an method to the PropertyChanged event? Visual Studio is going to give compile errors? Both are easily doable using the interface.

private void SomeMethod(object sender)
{
    var npc = this as INotifyPropertyChangedWithMethod;
    if (npc != null)
        npc.OnPropertyChanged("Sentences");
}


private void Instance_SearchWordsChangedEvent(object sender)
{
    var npc = MyObject as INotifyPropertyChangedWithMethod;
    if (npc != null)
        npc.PropertyChanged += NpcOnPropertyChanged;
}

private void NpcOnPropertyChanged(object sender, PropertyChangedEventArgs propertyChangedEventArgs)
{
    // code here...
}

Download

Here is a sample project and a project template and also a separate AspectMVVM project if you want the code. I’ll open source it on CodePlex.com soon.

AspectMVVM Example Project.zip
AspectMVVM Project Template.zip
AspectMVVM.zip

Displaying Images from a folder with details in WPF

Today I decided to write how to display images from a folder with details using WPF.

What is my motivation? This StackOverflow post: 
http://stackoverflow.com/questions/13034911/create-control-instance-in-wpf

Here is my full example project: ImageList.zip

The first thing I did was create a new WPF Project in Visual Studio. After that I followed these steps.

  1. Created an Images folder in the project and added two images.
  2. Changed the images properties in Visual Studio to have a Build Action of Content and to only Copy if newer.
  3. Created an ImageDetails object.
  4. Created XAML for displaying the image using binding.
  5. Wrote code behind to load images from a folder, get the image details, and add them to a list. Note: I had to add a reference to System.Drawing to use System.Drawing.Image.

The Model.

using System;
using System.Collections.Generic;
using System.Linq;
using System.Text;
using System.Threading.Tasks;

namespace ImageList.Model
{
    public class ImageDetails
    {
        /// <summary>
        /// A name for the image, not the file name.
        /// </summary>
        public string Name { get; set; }

        /// <summary>
        /// A description for the image.
        /// </summary>
        public string Description { get; set; }

        /// <summary>
        /// Full path such as c:\path\to\image.png
        /// </summary>
        public string Path { get; set; }

        /// <summary>
        /// The image file name such as image.png
        /// </summary>
        public string FileName { get; set; }

        /// <summary>
        /// The file name extension: bmp, gif, jpg, png, tiff, etc...
        /// </summary>
        public string Extension { get; set; }
        
        /// <summary>
        /// The image height
        /// </summary>
        public int Height { get; set; }

        /// <summary>
        /// The image width.
        /// </summary>
        public int Width { get; set; }

        /// <summary>
        /// The file size of the image.
        /// </summary>
        public long Size { get; set; }
        
    }
}

The XAML. Basically it is an ItemsControl with an ItemsTemplate and all the complexity and binding is in the ItemsTemplate.

<Window x:Class="ImageList.MainWindow"
        xmlns="http://schemas.microsoft.com/winfx/2006/xaml/presentation"
        xmlns:x="http://schemas.microsoft.com/winfx/2006/xaml"
        Title="MainWindow" Height="350" Width="525" Loaded="Window_Loaded_1">
    <Grid>
        <ItemsControl Name="ImageList" ItemsSource="{Binding ImageList}">
            <ItemsControl.ItemTemplate>
                <DataTemplate>
                    <Border BorderThickness="1" BorderBrush="#FFD0D1D7" Padding="5" Margin="10,10,0,0">
                        <StackPanel Orientation="Horizontal">
                            <!--image and dimensions-->
                            <Grid Width="88" Height="55">
                                <Image Source="{Binding Path}"/>
                                <TextBlock Background="#B2000000" Foreground="White" Height="16" TextAlignment="Center" VerticalAlignment="Bottom">
                                    <TextBlock.Text>
                                        <MultiBinding StringFormat="{}{0}x{1}">
                                            <Binding Path="Height"/>
                                            <Binding Path="Width"/>
                                        </MultiBinding>
                                    </TextBlock.Text>
                                </TextBlock>
                            </Grid>
                            <!--name, type and size-->
                            <StackPanel Orientation="Vertical" Margin="5,0,0,0" VerticalAlignment="Center">
                                <TextBlock Name="ImageName" Margin="1" Foreground="#FF787878" Text="{Binding FileName}"/>
                                <TextBlock Name="ImageType" Margin="1" Foreground="#FF787878">
                                    <TextBlock.Text>
                                        <MultiBinding StringFormat="Type: {0}">
                                            <Binding Path="Extension"/>
                                        </MultiBinding>
                                    </TextBlock.Text>
                                </TextBlock>
                                <TextBlock Name="ImageSize" Margin="1" Foreground="#FF787878">
                                    <TextBlock.Text>
                                        <MultiBinding StringFormat="Size: {0} Bytes">
                                            <Binding Path="Size"/>
                                        </MultiBinding>
                                    </TextBlock.Text>
                                </TextBlock>
                            </StackPanel>
                        </StackPanel>
                    </Border>
                </DataTemplate>
            </ItemsControl.ItemTemplate>
        </ItemsControl>
    </Grid>
</Window>

The Code behind. Feel free to switch this to use MVVM if needed. I didn’t use MVVM only because this is an example only.

using ImageList.Model;
using System;
using System.Collections.Generic;
using System.IO;
using System.Linq;
using System.Windows;
using System.Windows.Media;
using System.Windows.Media.Imaging;

namespace ImageList
{
    /// <summary>
    /// Interaction logic for MainWindow.xaml
    /// </summary>
    public partial class MainWindow : Window
    {
        public MainWindow()
        {
            InitializeComponent();
        }

        private void Window_Loaded_1(object sender, RoutedEventArgs e)
        {
            string root = System.IO.Path.GetDirectoryName(System.Reflection.Assembly.GetExecutingAssembly().Location);
            string[] supportedExtensions = new[] { ".bmp", ".jpeg", ".jpg", ".png", ".tiff" };
            var files = Directory.GetFiles(Path.Combine(root, "Images"), "*.*").Where(s => supportedExtensions.Contains(Path.GetExtension(s).ToLower()));

            List<ImageDetails> images = new List<ImageDetails>();

            foreach (var file in files)
            {
                ImageDetails id = new ImageDetails()
                {
                    Path = file,
                    FileName = Path.GetFileName(file),
                    Extension = Path.GetExtension(file)
                };

                BitmapImage img = new BitmapImage();
                img.BeginInit();
                img.CacheOption = BitmapCacheOption.OnLoad;
                img.UriSource = new Uri(file, UriKind.Absolute);
                img.EndInit();
                id.Width = img.PixelWidth;
                id.Height = img.PixelHeight;

                // I couldn't find file size in BitmapImage
                FileInfo fi = new FileInfo(file);
                id.Size = fi.Length;
                images.Add(id);
            }

            ImageList.ItemsSource = images;
        }
    }
}

How to avoid a blurry screen when using DropShadowEffects

Today, I created a DropShadowEffect on a Border. Any child of that border ended up being slightly blurry as well.

Well, it turns out that this is just the way it is. Child data of a Border will get blurry if a blur affects is applied to a Border.

The fix was somewhat easy. Make the border a sibling, not a parent.  What does this mean?  Look at the difference in the below XAML.

Border as Parent (Bad and Blurry)

<Window x:Class="RoundedCornerApp.RoundedCornerWindow"
        xmlns="http://schemas.microsoft.com/winfx/2006/xaml/presentation"
        xmlns:x="http://schemas.microsoft.com/winfx/2006/xaml"
        WindowStartupLocation="CenterScreen"
        Title="Rounded Corner Window"            
        Height="690" Width="890" 
        Style="{DynamicResource RoundedCornerWindowStyle}">
    <Border x:Name="MainBorder" Style="{DynamicResource RoundedCornerMainBorderStyle}" >
        <Grid Name="MainGrid" Style="{DynamicResource RoundedCornerMainGridStyle}" >
        </Grid>
    </Border>
</Window>

Border as Sibling (Good and Clear)

<Window x:Class="RoundedCornerApp.RoundedCornerWindow"
        xmlns="http://schemas.microsoft.com/winfx/2006/xaml/presentation"
        xmlns:x="http://schemas.microsoft.com/winfx/2006/xaml"
        WindowStartupLocation="CenterScreen"
        Title="Rounded Corner Window"            
        Height="690" Width="890" 
        Style="{DynamicResource RoundedCornerWindowStyle}">
    <Grid Style="{DynamicResource RoundedSiblingGridStyle}" MouseLeftButtonDown="DragWindow" >
        <Border x:Name="MainBorder" Style="{DynamicResource RoundedCornerMainBorderStyle}" />
        <Grid Name="MainGrid" Style="{DynamicResource RoundedCornerMainGridStyle}" >


        </Grid>
    </Grid>
</Window>

Notice that we first add a parent Grid, then we remove the child MainGrid from the MainBorder and put both the MainBorder and the MainGrid under the new parent Grid. This did take a little different styling, but it resolved the issue. I no longer have blurriness when using a DropShadowEffect on my border.

Here is my Style ResourceDictionary.

<ResourceDictionary
	xmlns="http://schemas.microsoft.com/winfx/2006/xaml/presentation" 
	xmlns:x="http://schemas.microsoft.com/winfx/2006/xaml">

    <!-- Start - Rounded Corner Window Style -->
    <Style x:Key="RoundedCornerWindowStyle" TargetType="{x:Type Window}">
        <Setter Property="WindowStyle" Value="None" />
        <Setter Property="AllowsTransparency" Value="True" />
        <Setter Property="Background" Value="Transparent" />
    </Style>
    <!-- End - Rounded Corner Window Style -->

    <!-- Start - Sibling Grid Holder Style -->
    <Style x:Key="RoundedSiblingGridStyle" TargetType="{x:Type Grid}" BasedOn="{x:Null}" />
    <!-- Start - Sibling Grid Holder Style -->

    <!-- Start - Main Border Style -->
    <Style x:Key="RoundedCornerMainBorderStyle" TargetType="{x:Type Border}">
        <Setter Property="CornerRadius" Value="10" />
        <Setter Property="Margin" Value="0,0,10,10" />
        <Setter Property="Background" Value="#FF112DB7" />
        <Setter Property="BorderBrush" Value="Black" />
        <Setter Property="BorderThickness" Value="2" />
        <Setter Property="OpacityMask" Value="#FF223EC7"  />
        <!--Some apps looks fuzzy-->
        <Setter Property="Effect">
            <Setter.Value>
                <DropShadowEffect Color="Gray" Opacity=".50" ShadowDepth="10" />
            </Setter.Value>
        </Setter>
    </Style>
    <!-- End - Main Border Style -->

    <!-- Start - Main Grid Style -->
    <Style x:Key="RoundedCornerMainGridStyle" TargetType="{x:Type Grid}">
        <Setter Property="Margin" Value="10,10,20,20" />
    </Style>
    <!-- End - Main Grid Style -->
</ResourceDictionary>

A WPF Searchable TextBlock Control with Highlighting

So I needed a TextBlock that was searchable and from searching online, it seems a lot of people need one too. So I decided to inherit TextBlock and write a SearchableTextBox. It is really easy to use.

WPF SearchTextBlock Example Project

Here is an example application you can download or clone: WpfSharp.Controls

SearchableTextBlock Explained

Here are the steps for creating this SearchableTextBlock

  1. Hide the Text dependency property by making it private. I did this because TextBlock doesn’t have a TextChanged event.
  2. Create a public HighlightableText dependency property that wraps the Text property. You can now bind to HighlightableText.
  3. Add a dependency property each for HighlightForeground and HighlightBackground.
  4. Added a list of searchable words as a dependency property and some code to turn the word list into a regular expression.
  5. Add a new set to the Text property so that it enters the string value as Run objects and adds the highlighting.

Here is the object for you to browse.

using System;
using System.Text.RegularExpressions;
using System.Windows;
using System.Windows.Controls;
using System.Windows.Documents;
using System.Windows.Media;
using System.Collections.Generic;

namespace HighlightText
{
    public class SearchableTextBlock : TextBlock
    {
        #region Constructors
        // Summary:
        //     Initializes a new instance of the System.Windows.Controls.TextBlock class.
        public SearchableTextBlock()
        {
            //Binding binding = new Binding("HighlightableText");
            //binding.Source = this;
            //binding.Mode = BindingMode.TwoWay;
            //SetBinding(TextProperty, binding);
        }

        public SearchableTextBlock(Inline inline)
            : base(inline)
        {
        }
        #endregion

        #region Properties
        new private string Text
        {
            set
            {
                if (string.IsNullOrWhiteSpace(RegularExpression) || !IsValidRegex(RegularExpression))
                {
                    base.Text = value;
                    return;
                }

                Inlines.Clear();
                string[] split = Regex.Split(value, RegularExpression, RegexOptions.IgnoreCase);
                foreach (var str in split)
                {
                    Run run = new Run(str);
                    if (Regex.IsMatch(str, RegularExpression, RegexOptions.IgnoreCase))
                    {
                        run.Background = HighlightBackground;
                        run.Foreground = HighlightForeground;
                    }
                    Inlines.Add(run);
                }
            }
        }

        public string RegularExpression
        {
            get { return _RegularExpression; }
            set
            {
                _RegularExpression = value;
                Text = base.Text;
            }
        } private string _RegularExpression;

        #endregion

        #region Dependency Properties

        #region Search Words
        public List SearchWords
        {
            get
            {
                if (null == (List)GetValue(SearchWordsProperty))
                    SetValue(SearchWordsProperty, new List());
                return (List)GetValue(SearchWordsProperty);
            }
            set
            {
                SetValue(SearchWordsProperty, value);
                UpdateRegex();
            }
        }

        // Using a DependencyProperty as the backing store for SearchStringList.  This enables animation, styling, binding, etc...
        public static readonly DependencyProperty SearchWordsProperty =
            DependencyProperty.Register("SearchWords", typeof(List), typeof(SearchableTextBlock), new PropertyMetadata(new PropertyChangedCallback(SearchWordsPropertyChanged)));

        public static void SearchWordsPropertyChanged(DependencyObject inDO, DependencyPropertyChangedEventArgs inArgs)
        {
            SearchableTextBlock stb = inDO as SearchableTextBlock;
            if (stb == null)
                return;

            stb.UpdateRegex();
        }
        #endregion

        #region HighlightableText
        public event EventHandler OnHighlightableTextChanged;

        public string HighlightableText
        {
            get { return (string)GetValue(HighlightableTextProperty); }
            set { SetValue(HighlightableTextProperty, value); }
        }

        // Using a DependencyProperty as the backing store for HighlightableText.  This enables animation, styling, binding, etc...
        public static readonly DependencyProperty HighlightableTextProperty =
            DependencyProperty.Register("HighlightableText", typeof(string), typeof(SearchableTextBlock), new PropertyMetadata(new PropertyChangedCallback(HighlightableTextChanged)));

        public static void HighlightableTextChanged(DependencyObject inDO, DependencyPropertyChangedEventArgs inArgs)
        {
            SearchableTextBlock stb = inDO as SearchableTextBlock;
            stb.Text = stb.HighlightableText;

            // Raise the event by using the () operator.
            if (stb.OnHighlightableTextChanged != null)
                stb.OnHighlightableTextChanged(stb, null);
        }
        #endregion

        #region HighlightForeground
        public event EventHandler OnHighlightForegroundChanged;

        public Brush HighlightForeground
        {
            get
            {
                if ((Brush)GetValue(HighlightForegroundProperty) == null)
                    SetValue(HighlightForegroundProperty, Brushes.Black);
                return (Brush)GetValue(HighlightForegroundProperty);
            }
            set { SetValue(HighlightForegroundProperty, value); }
        }

        // Using a DependencyProperty as the backing store for HighlightForeground.  This enables animation, styling, binding, etc...
        public static readonly DependencyProperty HighlightForegroundProperty =
            DependencyProperty.Register("HighlightForeground", typeof(Brush), typeof(SearchableTextBlock), new PropertyMetadata(new PropertyChangedCallback(HighlightableForegroundChanged)));

        public static void HighlightableForegroundChanged(DependencyObject inDO, DependencyPropertyChangedEventArgs inArgs)
        {
            SearchableTextBlock stb = inDO as SearchableTextBlock;
            // Raise the event by using the () operator.
            if (stb.OnHighlightForegroundChanged != null)
                stb.OnHighlightForegroundChanged(stb, null);
        }
        #endregion

        #region HighlightBackground
        public event EventHandler OnHighlightBackgroundChanged;

        public Brush HighlightBackground
        {
            get
            {
                if ((Brush)GetValue(HighlightBackgroundProperty) == null)
                    SetValue(HighlightBackgroundProperty, Brushes.Yellow);
                return (Brush)GetValue(HighlightBackgroundProperty);
            }
            set { SetValue(HighlightBackgroundProperty, value); }
        }

        // Using a DependencyProperty as the backing store for HighlightBackground.  This enables animation, styling, binding, etc...
        public static readonly DependencyProperty HighlightBackgroundProperty =
            DependencyProperty.Register("HighlightBackground", typeof(Brush), typeof(SearchableTextBlock), new PropertyMetadata(new PropertyChangedCallback(HighlightableBackgroundChanged)));

        public static void HighlightableBackgroundChanged(DependencyObject inDO, DependencyPropertyChangedEventArgs inArgs)
        {
            SearchableTextBlock stb = inDO as SearchableTextBlock;
            // Raise the event by using the () operator.
            if (stb.OnHighlightBackgroundChanged != null)
                stb.OnHighlightBackgroundChanged(stb, null);
        }
        #endregion

        #endregion

        #region Methods
        public void AddSearchString(String inString)
        {
            SearchWords.Add(inString);
            Update();
        }

        public void Update()
        {
            UpdateRegex();
        }

        public void RefreshHighlightedText()
        {
            Text = base.Text;
        }

        private void UpdateRegex()
        {
            string newRegularExpression = string.Empty;
            foreach (string s in SearchWords)
            {
                if (newRegularExpression.Length > 0)
                    newRegularExpression += "|";
                newRegularExpression += RegexWrap(s);
            }

            if (RegularExpression != newRegularExpression)
                RegularExpression = newRegularExpression;
        }

        public bool IsValidRegex(string inRegex)
        {
            if (string.IsNullOrEmpty(inRegex))
                return false;

            try
            {
                Regex.Match("", inRegex);
            }
            catch (ArgumentException)
            {
                return false;
            }

            return true;
        }

        private string RegexWrap(string inString)
        {
            // Use positive look ahead and positive look behind tags
            // so the break is before and after each word, so the
            // actual word is not removed by Regex.Split()
            return String.Format("(?={0})|(?<={0})", inString);
        }
        #endregion
    }
}

WPF MenuItem as a RadioButton

It seems that there is not a MenuItem that works as a RadioButton that allows only a single selection that is in WPF. So I set off to figure out the best way to do this in WPF.

So let me go ahead and put the final solution right here on top. Then I will walk you through how I arrived at this solution. I researched a lot of solutions and none of them were this solution. I had to figure this one out myself  and I am glad I did because this one is the shortest and sweetest solution yet.

Here is a project showing how to do this with two examples, one directly in the MainWindow.xaml and one as its own class.

MenuItemWithRadioButtonExample.zip

Here is the code for creating a class that just works as a MenuItem with a RadioButton.

<MenuItem x:Class="MenuItemWithRadioButtonExample.MenuItemWithRadioButton"
          xmlns="http://schemas.microsoft.com/winfx/2006/xaml/presentation"
          xmlns:x="http://schemas.microsoft.com/winfx/2006/xaml"
          Header="RadioButton Menu" >
    <MenuItem.Resources>
        <RadioButton x:Key="RadioButtonResource" x:Shared="false" HorizontalAlignment="Center"
                     GroupName="MenuItemRadio" IsHitTestVisible="False"/>
    </MenuItem.Resources>
    <MenuItem.ItemContainerStyle>
        <Style TargetType="MenuItem">
            <Setter Property="Icon" Value="{DynamicResource RadioButtonResource}"/>
            <EventSetter Event="Click" Handler="MenuItemWithRadioButtons_Click" />
        </Style>
    </MenuItem.ItemContainerStyle>
</MenuItem>

Then you need to add the MenuItemWithRadioButtons_Click event method to your code-behind as well.

private void MenuItemWithRadioButtons_Click(object sender, System.Windows.RoutedEventArgs e)
{
    MenuItem mi = sender as MenuItem;
    if (mi != null)
    {
        RadioButton rb = mi.Icon as RadioButton;
        if (rb != null)
        {
            rb.IsChecked = true;
        }
    }
}

Note: Since this even code involves the View only, this doesn’t break MVVM. With MVVM it is allowed to put code in the code-behind as long as it is code only for the View.

This works quite well and I am quite happy with it. Here is how it looks

Attempt 1 – A RadioButton in MenuItem.ItemsTemplate

Result = Failed!

I changed the MenuItem.ItemsTemplate, as follows.

<MenuItem.ItemTemplate>
    <DataTemplate>
        <RadioButton Content="{Binding}" GroupName="Group" />
    </DataTemplate>
</MenuItem.ItemTemplate>

This almost worked, but it wasn’t quite right. It turns out that anything in the DataTemplate is actually boxed inside a MenuItem, so it left a space. Look at this screen shot.

Notice there is a square space on the left, then a slight separator, then our RadioButton. We need the toggle to be in that empty box, and only the text to be on the right. Also clicking on the empty box doesn’t click the RadioButton.

So I need to figure out how to make it not be boxed in a MenuItem. It might be possible to find a way to make the DataTemplate not be boxed in a MenuItem, but I researched this and decided it wasn’t the best way to go.

Attempt 2 – A RadioButton in MenuItem.ItemContainerStyle

Result = Failed!

In my second attempt, I attempted to change the ItemContainerStyle.

<MenuItem.ItemContainerStyle>
    <Style TargetType="MenuItem">
        <Setter Property="Icon">
            <Setter.Value>
                <RadioButton HorizontalAlignment="Center" GroupName="MenuItemRadio" />
            </Setter.Value>
        </Setter>
    </Style>
</MenuItem.ItemContainerStyle>

This didn’t work either. Look at this screen shot.

It seems that only one instance of the RadioButton was created on so only the last item it was applied to actual showed it.

It had a second issue in that the RadioButton didn’t actually have any content. This might be a problem if you are hoping to use the Content in a click event. It seems that both MenuItem.Header and RadioButton.Content should be the same value, but only the MenuItem.Header should display.

The third issue was that the RadioButton is only toggled when clicking directly on the RadioButton, but not when clicking on the text or “Header” portion of the MenuItem.

The fourth issue is that when clicking the RadioButton the menu stays open even if StayOpenOnClick=”false” is set.

Attempt 3 – An unshared RadioButton in Resources used by MenuItem.ItemsTemplate (Success)

While it didn’t work the first time, this method had promise. Step two got me close, but left me with three problems to solve.

  1. I needed to figure out a way to not have the MenuItem elements share the RadioButton and that didn’t take long to research and resolve. I just needed to declare the RadioButton outside the Style and then use a StaticResource to bind to it.
  2. I needed to add an event to have the MenuItem click pass the click on to the RadioButton. That was easy enough.
  3. I needed to make it so the Menu would close when clicking directly on the RadioButton. I actually just set IsHitTestVisible=”false” on the RadioButton, because we already made just clicking the MenuItem work in problem 2.
  4. I had to change the RadioButton’s Horizontal Alignment to Center to make it look best.

So here is a screenshot so you can see it looks just how you want.

Check out the Xaml and event method as well as the example project at the top of this page.

Note: If you need to make the MenuItem.Header and RadioButton.Content share the same value, then do this:

<MenuItem x:Class="MenuItemWithRadioButtonExample.MenuItemWithRadioButton"
          xmlns="http://schemas.microsoft.com/winfx/2006/xaml/presentation"
          xmlns:x="http://schemas.microsoft.com/winfx/2006/xaml"
          Header="RadioButton Menu" >
    <MenuItem.Resources>
        <RadioButton x:Key="RadioButtonResource" x:Shared="false" HorizontalAlignment="Center" 
                     GroupName="MenuItemRadio" IsHitTestVisible="False">
            <RadioButton.Content>
                <Label Content="{Binding Path=Header, RelativeSource={RelativeSource FindAncestor, AncestorType={x:Type Window}}}"
                       Visibility="Collapsed"/>
            </RadioButton.Content>
        </RadioButton>
    </MenuItem.Resources>
    <MenuItem.ItemContainerStyle>
        <Style TargetType="MenuItem">
            <Setter Property="Icon" Value="{DynamicResource RadioButtonResource}"/>
            <EventSetter Event="Click" Handler="MenuItemWithRadioButtons_Click" />
        </Style>
    </MenuItem.ItemContainerStyle>
</MenuItem>

Notice that Visibility=”Collapsed” is set, as we don’t need both the MenuItem.Header and the RadioButton.Content to display. I thought I needed this, but it turned out I didn’t. Still, I thought I would share it anyway.

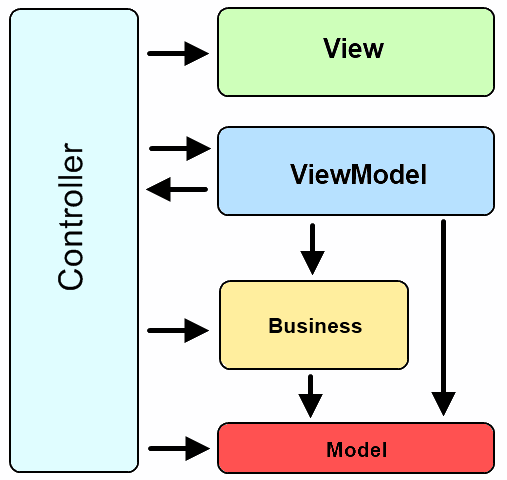
An actual in-production MVVM architecture

Actual MVVM Design

So the last project where I implemented MVVM that is in production for an enterprise product, the design pattern actually grew to included more than just the three items: Model, View, ViewModel.

Instead it looked like the image you see to the right.

The arrows indicate access.

  • Controller – Has access to all other objects. Basically the controller is created and it loads the first Views and ViewModels and assigns the DataContext of the Views.
  • View –  The view is only consumed by the controller (and dynamically so the controller doesn’t actually reference the View project or dll). Since the view is completely independent it can be replaced any time. The View is only connected to the ViewModel through binding when the controller assigns a ViewModel to the DataContext of a View.
  • ViewModel – An adapter layer on top of the model and business that also implements the necessary objects that are expected in the View’s bindings. The ViewModel communicates with the controller in order to tell it to change screens/switch to a new view. It is important in this design to note that the ViewModel never references the View and is completely independent of the View, which allows it to be applied to any View.
  • Business – The code that actual does the work. It only needs access to the Model but both the Controller and ViewModel have access to use it. However, the Controller seldom uses it but the ViewModel heavily uses it.
  • Model – Data objects. It doesn’t know about anything else, but the Controller, Business, and ViewModel all know about the Model.

How this design formed

Originally the MVVM pattern was used and the project started as a single project, with a separate folder and namespace for Model-View-ViewModel times.

As the application progressed, this design was created as separation of concerns were applied to each layer and as items were broken out into separate projects/dlls.

Why the Controller became a separate layer

Initially it seems that the View or the ViewModel (either) could handle being the Controller. However, we found that neither the View or the ViewModel acting as the Controller was a good idea for a couple of reasons. First, if the View or the ViewModel were also the Controller then they became dependent on too many items. It became clear quickly that the ViewModel was a better choice of the two and so it was chosen at first. However, with references to the View available to the ViewModel, developers began to cheat and couple the View to the ViewModel, until the ViewModel could not build without that exact View and the View was supposed to be dynamic and interchangeable.

So to keep the View decoupled from the ViewModel and visa-versa, a separate Controller project was created and no reference between the View or ViewModel was allowed.

Note: Actually the Business and Controller layers are in the same dll.

Why the Business layer was separated from the ViewModel

Initially the Business layer and the ViewModel layer were the same layer. Some of the business existed directly in the ViewModel and some were in separate classes. It quickly became apparent that the ViewModels were 1) getting too large, and 2) breaking the single responsibility principle. It became apparent that in order to maintain small class files and the single responsibility principle that the Business needed to exist outside of the ViewModel and the ViewModel would simply call the a single Business object or method when needed.

Other mistakes

Initially the Controller was a single class, then we realized that it was doing about ten things, and was over 1000 lines. Oops. It was refactored into separate objects, some of which actually turned out to belong in the business layer.  So it appeared that we allowed the business layer to bleed into the controller. As the file was analyzed it was clear that a certain amount of methods and properties were only for a particular use and so these were extracted to a separate class. This was actually repeated multiple times for different uses, after which, the controller returned to just being a controller and it was a smaller easy to maintain class.

Future architecture changes

As the product continued to grow, other changes are seen as necessary even though they haven’t yet been implemented.

Separation of the Controller from the Business layer

A few of the business objects were for the Controller only and the rest of the business objects are for the ViewModel only. Since the Controller and Business layers are still in the same dll, this doesn’t yet matter. However, it was becoming clear as the project grew that the Controller has its business and the ViewModel/functionality had it Business and there is little overlap if any. It is likely that the Controller and Business layer will see a separation and decoupling where the Controller no longer references the Business layer and the business classes used by the Controller is just part of the Controller.

View communication with the DataContext without binding

There arose instances where binding was not supported or did not exist. In many cases we used attached properties or an inherited object and added the missing bindings, however, in some instances this didn’t make sense. What if the View needed to send a message to the DataContext or pass and event to the code behind and neither inheriting the object to add the binding or using an attached property made sense. What made sense was an interface.

I recently posted an article on Creating an Interface for data binding in Views with WPF. Imagine a new layer that exists between the View and the ViewModel called IViewModel. Both the View and the ViewModel reference it and they still don’t reference each other. An interface in the IViewModel project/dll would mainly include properties that help the ViewModel know what is needed for binding. However, in such rare circumstances that it makes sense to communicate to the DataContext, the View can check if the DataContext implements an interfaces and calls a method the interface defines.

Creating an Interface for data binding in Views with WPF

Perhaps you have seen the same idea as me. A list of bound objects and an interface with a list of properties, have a lot in common. To start with, both are contracts. By adding Bindings in WPF, you are creating a contract that promises any code that uses the view that if such code has certain properties to bind to, the view will bind to them. Similarly an interface is a contract wherein an object that implements the interface is required to comply with the interface else a build error.

Look at the following UserControl view.

<UserControl x:Class="BindingsAsInterfaceExample.View.PeopleView"
             xmlns="http://schemas.microsoft.com/winfx/2006/xaml/presentation"
             xmlns:x="http://schemas.microsoft.com/winfx/2006/xaml"
             xmlns:mc="http://schemas.openxmlformats.org/markup-compatibility/2006"
             xmlns:d="http://schemas.microsoft.com/expression/blend/2008"
             mc:Ignorable="d"
             d:DesignHeight="200"
             d:DesignWidth="300"
             >
    <Grid>
        <Grid.RowDefinitions>
            <RowDefinition Height="*" />
            <RowDefinition Height="Auto" />
        </Grid.RowDefinitions>
        <Grid.ColumnDefinitions>
            <ColumnDefinition Width="*" />
            <ColumnDefinition Width="*" />
            <ColumnDefinition Width="*" />
        </Grid.ColumnDefinitions>
        <DataGrid ItemsSource="{Binding People}" Grid.Row="0" Grid.ColumnSpan="3" HeadersVisibility="Column" CanUserAddRows="False" />
        <Button Content="Add Person" Command="{Binding AddPersonCommand}" Grid.Row="1" Grid.Column="0" />
        <Button Content="Edit Person" Command="{Binding EditPersonCommand}" Grid.Row="1" Grid.Column="1" />
        <Button Content="Delete Person" Command="{Binding DeletePersonCommand}" Grid.Row="1" Grid.Column="2" />
    </Grid>
</UserControl>

There are four bindings in this view. It may be beneficial to make these bindings into a concrete contract using an interface.

public interface IPeopleViewBindings
{
    IList People { get; set; }
    ICommand AddPersonCommand { get; set; }
    ICommand EditPersonCommand { get; set; }
    ICommand DeletePersonCommand { get; set; }
}

Then when implementing the view model, have it implement the interface. Now if some binding value is missing, a compile time error occurs.

using System.Collections;
using System.Collections.Generic;
using System.Windows.Input;
using BindingsAsInterfaceExample.Interfaces;
using BindingsAsInterfaceExample.Model;
using MVVM;

namespace BindingsAsInterfaceExample.ViewModel
{
    class PeopleViewModel : ViewModelBase, IPeopleViewBindings
    {
        #region Properties
        public IList People
        {
            get { return _People ?? (_People = CreateSamplePeople()); }
            set { _People = value; }
        } private IList _People;

        public ICommand AddPersonCommand
        {
            get
            {
                return _AddPersonCommand ??
                    (_AddPersonCommand = new RelayCommand(f => AddPerson(), f => AddPersonCanExecute()));
            }
            set { _AddPersonCommand = value; }
        } private ICommand _AddPersonCommand;

        public ICommand EditPersonCommand
        {
            get
            {
                return _EditPersonCommand ??
                    (_EditPersonCommand = new RelayCommand(f => EditPerson(), f => EditPersonCanExecute()));
            }
            set { _EditPersonCommand = value; }
        } private ICommand _EditPersonCommand;

        public ICommand DeletePersonCommand
        {
            get
            {
                return _DeletePersonCommand ??
                    (_DeletePersonCommand = new RelayCommand(f => DeletePerson(), f => DeletePersonCanExecute()));
            }
            set { _DeletePersonCommand = value; }
        } private ICommand _DeletePersonCommand;
        #endregion

        #region Functions
        private IList CreateSamplePeople()
        {
            IList people = new List<Person>();

            people.Add(new Person() { FirstName = "John", MiddleName = "J.", LastName = "Johnson" });
            people.Add(new Person() { FirstName = "Mark", MiddleName = "M.", LastName = "Markson" });
            people.Add(new Person() { FirstName = "Thom", MiddleName = "T.", LastName = "Thompson" });

            return people;
        }

        private void AddPerson()
        {
            // ...
        }

        private bool AddPersonCanExecute()
        {
            return true;
        }

        private void EditPerson()
        {
            // ...
        }

        private bool EditPersonCanExecute()
        {
            return true;
        }

        private void DeletePerson()
        {
            // ...
        }

        private bool DeletePersonCanExecute()
        {
            return true;
        }
        #endregion
    }
}

This is solution is not without problems.

  1. Now when you add a binding to a view, you have to remember to add it to the interface as well, otherwise you are no better off.
  2. Interfaces don’t support private fields and a lot of the methods are private.

However, it is actually quite useful when creating an API that someone else is consuming. Users of the API documentation will be grateful for the interfaces.

XAML is Awesome!

Another test post that says XAML is awesome!

Why XAML is here to stay

Declarative user interfaces that support binding allow for decoupling the visual presentation of an application from the back end, which is often code, databases, files, or a combination of all of them.

This decoupling leads to easy maintainability.

I use WPF

I am a big fan of WPF and I use it when ever I can. I love XAML and I love data binding. The MVVM design pattern really helps in creating a decoupled, maintainable product.

As I work on my Masters of Computer Science, I do my homework with full WPF and Binding  using MVVM because it is fast and clean. If I take time to open it in Expression Blend and work on the WPF Design, it looks good too.

Check out my latest Unit Test project over on my other blog. I of course wrote it in WPF using Binding and MVVM.

Unit Test Stub Code Generator for Covering Arrays