Archive for the ‘Visual Studio’ Category.

How to find and remove unused references in a C# project

Often  your projects is created with default references, some of which you will never use. Sometime you add a reference but then end up not using it. Over time you may have over a dozen references in each of a dozen projects and you know you are not using half of them.

I know two tools that will resolve this. One if free and is a plugin only for this feature. The other is a commercial product and has hundred of features.

Remove Unused References – Free Tool

I prefer the free tool by far as it is a simple and easy to use Visual Studio plugin. So I will test it first.

Remove Unused References

Click the link and it download and installs in seconds.

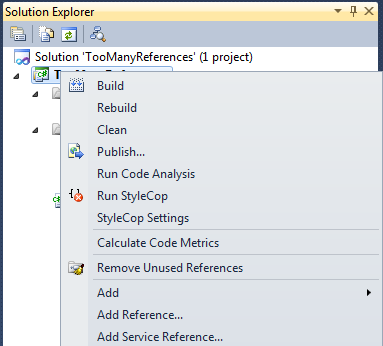
Then you will see the feature when you right-click on a project in Visual Studio.

Click it and it will remove any references that are not actually being used.

Ok, now lets create a sample project and see if this will work.

I am created a new Console Application and added the following code to the Program.cs

using System;
using System.Data;

namespace TooManyReferences
{
    class Program
    {
        static void Main(string[] args)
        {
            // I need System, System.Data, and System.Xml
            DataTable table = new DataTable();
            table.Columns.Add(new DataColumn("FistName",typeof(String)));
            table.Columns.Add(new DataColumn("LastName", typeof(String)));
            DataRow row = table.NewRow();
            row["FirstName"] = "Jared";
            row["LastName"] = "Barneck";
            table.Rows.Add(row);
            Console.WriteLine(table.Rows[0]);
        }
    }
}

Now lets right-click on the project and choose Remove Unused References.

Unfortunately, my expectation were not met.

Expectatation

The following reference should remain:

  • System
  • System.Data
  • System.XML

My project should build.

Actual Result

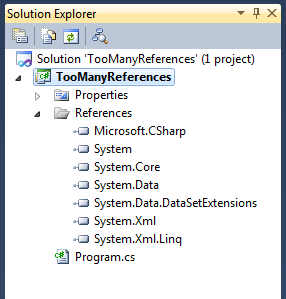
The following references remained:

  • System.Data

My project failed to build with the following errors

Error 1 The type 'System.Xml.Serialization.IXmlSerializable' is defined in an assembly that is not referenced. You must add a reference to assembly 'System.Xml, Version=4.0.0.0, Culture=neutral, PublicKeyToken=b77a5c561934e089'. C:\Users\212070783\Documents\Visual Studio 2010\Projects\TooManyReferences\TooManyReferences\Program.cs 11 13 TooManyReferences
Error 2 The type 'System.ComponentModel.ISupportInitialize' is defined in an assembly that is not referenced. You must add a reference to assembly 'System, Version=4.0.0.0, Culture=neutral, PublicKeyToken=b77a5c561934e089'. C:\Users\212070783\Documents\Visual Studio 2010\Projects\TooManyReferences\TooManyReferences\Program.cs 11 13 TooManyReferences
Error 3 The type 'System.ComponentModel.ISupportInitializeNotification' is defined in an assembly that is not referenced. You must add a reference to assembly 'System, Version=4.0.0.0, Culture=neutral, PublicKeyToken=b77a5c561934e089'. C:\Users\212070783\Documents\Visual Studio 2010\Projects\TooManyReferences\TooManyReferences\Program.cs 11 13 TooManyReferences
Error 4 The type 'System.ComponentModel.IListSource' is defined in an assembly that is not referenced. You must add a reference to assembly 'System, Version=4.0.0.0, Culture=neutral, PublicKeyToken=b77a5c561934e089'. C:\Users\212070783\Documents\Visual Studio 2010\Projects\TooManyReferences\TooManyReferences\Program.cs 11 13 TooManyReferences
Error 5 The type 'System.ComponentModel.MarshalByValueComponent' is defined in an assembly that is not referenced. You must add a reference to assembly 'System, Version=4.0.0.0, Culture=neutral, PublicKeyToken=b77a5c561934e089'. C:\Users\212070783\Documents\Visual Studio 2010\Projects\TooManyReferences\TooManyReferences\Program.cs 11 13 TooManyReferences

Note: Remember TooManyReferences is the name of my sample project and that is actually confusing in the log.

Conclusion

This tool removes references it should not remove.

If you use this tool, try using it on one project at a time in a large solution, otherwise you could get overwhelmed with failures.

It is pretty easy to add back references, so it is usable, but if it could be taken one step further, to resolve the references needed by objects my code uses, then it would probably be the best and simplest tool out there for this.

Bug Submitted

Remove Unused References – Commerical Tool

Resharper is the commercial tool that solves this problem. Unfortunately it is not free. However, it works well and I don’t currently have a license, but remember that it did not remove needed references when I last used it. Here is a link for more information.

http://www.jetbrains.com/resharper/webhelp/Refactorings__Remove_Unused_References.html

Visual Studio Training Videos – A check list of videos from WindowsClient.net

WPF in Visual Studio Training Videos


Overview

WPF – Getting Started

WPF – Design, Layout, Styles, T

WPF – Advanced

3D, Animation, Video, Sound

All Videos


Sheet 1: WPF – Getting Started

WPF – Getting Started and more
Completed Introduction Videos
Your First WPF Application 08 min 33 sec Getting Started
How Do I: Create a Simple Data Entry Form in WPF 24 min 32 sec Getting Started
How Do I: Create a Splash Screen in WPF 14 min Getting Started
How Do I: Define and Use Namespaces in WPF 23 min 16 sec Getting Started
How to Create a WPF Application 10 min 19 sec Getting Started

Accessing Command Line Parameters 06 min 13 sec Code
Reflections in Visual Studio and Blend 14 min 11 sec Code
Control When Bound Data is Updated 19 min 33 sec Binding
How Do I: Build a ValueConverter to Format Bound Data in WPF 17 min 17 sec Binding
How Do I: Create and Use a Converter to Change DataTypes 19 min 23 sec Binding
How Do I: Use FallbackValue in WPF Binding 09 min 38 sec Binding
How Do I: Use TargetNullValue to Handle Nullable Types in WPF Binding 10 min 44 sec Binding
How Do I: Using StringFormat when Multibinding 11 min Binding
How Do I: Visually Indicate Binding Error Status 12 min 16 sec Binding

How to Use XAML in WPF 10 min 34 sec XAML
Create and Browse Loose XAML Files 08 min 20 sec XAML
Extend Control Functionality Using XAML Attached Properties 23 min 47 sec XAML
How Do I: Use Attached Properties to Store Extra Data in WPF 17 min 16 sec XAML
How Do I: Using Path Markup Language to Define a Path 21 min 9 sec XAML
Create User Controls in WPF 12 min 43 sec Controls
How Do I: Build an Asynchronous Progress Bar in WPF 24 min 48 sec Controls
How Do I: Create a Simple WPF DataGrid to Edit Tabular Data 31 min 3 sec Controls
How Do I: Create Lookup Combobox in WPF 23 min 43 sec Controls
How Do I: Display Data in a List in WPF 11 min 47 sec Controls
How Do I: Use the WebBrowser Control in WPF 21 min 25 sec Controls
How to Create a User Control in WPF 11 min 38 sec Controls
Introducing the WPF 4 Calendar Control 17 min 49 sec Controls
Using Alternating Rows in an ItemsControl 14 min 54 sec Controls
Working With Context Menus in WPF 13 min 5 sec Controls
Creating Navigation Applications in WPF 11 min 45 sec Navigation
Passing Data Between Pages In Navigation Based Applications 08 min 55 sec Navigation
Use the Page Functions to Retrieve Data and Pass it Back to a Previous Page 12 min 22 sec Navigation
WPF Navigation Application 11 min 33 sec Navigation
Deploying a Standard WPF Application Using ClickOnce and Visual Studio 16 min 47 sec Deploy
Host a WPF Control in a Win32 Application 19 min 59 sec Integration
How Do I: Use a WPF Control in a Windows Form using ElementHost 06 min 52 sec Integration
How Do I: WinForms WPF Integration 11 min Integration
Creating and Consuming Resource Dictionaries in WPF and Silverlight 13 min 9 sec Resource Dictionaries
How Do I: Use Resource Files for Localization both in XAML and Code 25 min 16 sec Localization

Sheet 2: WPF – Design, Layout, Styles, T

WPF – Design, Layout, Styles, Templates
Completed Introduction Videos
How to Layout a WPF Application 14 min 5 sec Design
Layout Techniques for Windows Forms Developers 20 min 19 sec Design
Create Gadget Style Windows in WPF 07 min 37 sec Design
Create WPF Master – Detail UI Using Data Sources Window Object DataSource 25 min 24 sec Design
Grid Control Design-Time Row and Column Manipulation Features 05 min 40 sec Design
How Do I: Add Design Time Data to a Control 13 min 48 sec Design
How Do I: Create a Master-Detail Data Entry Form in WPF 24 min 58 sec Design
How Do I: Detect Designmode in a Usercontrol 10 min 26 sec Design
Apply Styles in WPF 12 min 40 sec Style
How Do I: Change the Appearance of Grouped Data Using Styles 18 min 40 sec Style
How Do I: Customize the Appearance of a ListBox in WPF 16 min 16 sec Style
How Do I: Customize the Appearance of ListBox ListItems in WPF 15 min 2 sec Style
How Do I: Use ResourceDictionary Elements Exported from Expression Design 2 19 min 3 sec Style
How to Use Styles in WPF 10 min 22 sec Style
Introduction to Themes in WPF 15 min 14 sec Style
Override a Style for a Local Control’s Property Value in WPF 12 min 34 sec Style
Sharing Styles Among Heterogeneous Elements 21 min 31 sec Style
Skinning a WPF Application 21 min 31 sec Style
Style Inheritance using BasedOn in WPF 17 min 28 sec Style
How to Apply Control Templates in WPF 12 min 24 sec Templates
How to Use Data Templates in WPF 14 min 59 sec Templates
Use a Control Template to Define a Desired Look 16 min 34 sec Templates
How Do I: Use Windows 7 Text-to-Speech from .NET 4 and WPF 20 min 36 sec Text-to-speech

Sheet 3: WPF – Advanced

WPF – Advanced
Completed Introduction Videos
How Do I: Create a Custom Command in WPF 18 min 06 sec Commands
How Do I: Use Command Binding in WPF 24 min 18 sec Commands

Create Dependency Properties in WPF 21 min 23 sec Dependency Properties
How Do I: Build Data-driven WPF Application using the MVVM pattern 47 min 23 sec MVVM
How Do I: Use ASP.NET Membership Provider for WPF Authentication 25 min 04 sec ASP.NET
Complex Logic Using Triggers in WPF 13 min 36 sec Triggers
Implementing Data Triggers in WPF 10 min 25 sec Triggers
Implementing Property Triggers in WPF 13 min 2 sec Triggers
Interactivity Through Triggers in WPF Control Templates 15 min 26 sec Triggers
How Do I: Implement Windows 7 Taskbar Icon Overlays with WPF 4 13 min 21 sec Taskbar integration
How do I: Use Windows 7 Taskbar Progress Reporting from WPF 4 10 min 45 sec Taskbar integration
How Do I: Associate a Validation Rule with a Binding 16 min 53 sec Validation
How Do I: Control Item Activation By Data Validation? 24 min 43 sec Validation
How Do I: Create a Custom Binding Validator 20 min Validation
How Do I: Hook Up and Display Validation in WPF 22 min 20 sec Validation
How Do I: Setting and Clearing Validation Errors in code 14 min 18 sec Validation
Adding Annotations to Flow Documents 04 min 35 sec ??
How to Use Isolated Storage 10 min 38 sec ??
How Do I: Retrieve XML Data From the Server in an XBAP Application 12 min 36 sec Service
How to Consume a Data Service in WPF 13 min 6 sec Service

How Do I: Use CollectionViews to Sort and Filter Data 24 min 23 sec Sort/Filter

Sheet 4: 3D, Animation, Video, Sound

WPF – 3D, Animation, Video, Sound
Completed Introduction Videos
How Do I: Apply Textures to a 3D object 24 min 22 sec 3D
How Do I: Create Custom Pixel Shader Effects for WPF 28 min 41 sec 3D
How Do I: Get Started with 3D Elements in WPF 31 min 39 sec 3D
How Do I: Work with Lighting in WPF 3D 20 min 26 sec 3D

Basic Animation in WPF Using XAML 19 min 26 sec Animation
Build a Custom GridLength Animation 20 min 18 sec Animation
Confine Animation to a Path 12 min 43 sec Animation
How Do I: Animate an Effect in WPF? 17 min 52 sec Animation
How Do I: Create a Dynamic Storyboard in WPF 20 min 8 sec Animation
How Do I: Use PointAnimation to Animate a Path in WPF 14 min 22 sec Animation
Kerning XAML Animations in WPF 16 min 18 sec Animation
How Do I: Add Sound to a WPF Application 17 min 48 sec Sound
Responding to Events with SoundPlayerAction 15 min 37 sec Sound
How Do I: Custom Easing Functions in WPF 4 16 min 49 sec Easing
Introduction to Easing Functions in WPF 4 15 min 23 sec Easing
Ink Basics in WPF 09 min 53 sec ??
Use PathGeometries in WPF 20 min 32 sec ??
Building a Client Profile Deployment for photoSuru 09 min 53 sec ??
Control Video Playback in WPF 14 min 36 sec Video
How Do I: Paint with Video in WPF 16 min 58 sec Video
How Do I: Use Video in WPF Applications 15 min 12 sec Video
Windows 7 Sensor and Location API Part 2 – Accelerometer as a Joystick 21 min 38 sec Gaming

Sheet 5: All Videos

WPF – All Videos
Completed Complete list of videos
Create WPF Master – Detail UI Using Data Sources Window Object DataSource 25 min 24 sec Design
Layout Techniques for Windows Forms Developers 20 min 19 sec Design
Grid Control Design-Time Row and Column Manipulation Features 05 min 40 sec Design
Creating and Consuming Resource Dictionaries in WPF and Silverlight 13 min 9 sec Resource Dictionaries
How Do I: Build My First WPF Application 32 min 40 sec Getting Started
How Do I: Setting and Clearing Validation Errors in code 14 min 18 sec Validation
How Do I: Build Data-driven WPF Application using the MVVM pattern 47 min 23 sec MVVM
How Do I: Use TargetNullValue to Handle Nullable Types in WPF Binding 10 min 44 sec Binding
How Do I: Using StringFormat when Multibinding 11 min Binding
How Do I: Use FallbackValue in WPF Binding 09 min 38 sec Binding
Windows 7 Sensor and Location API Part 2 – Accelerometer as a Joystick 21 min 38 sec Gaming
How Do I: Implement Windows 7 Taskbar Icon Overlays with WPF 4 13 min 21 sec Taskbar integration
How Do I: Use Windows 7 Text-to-Speech from .NET 4 and WPF 20 min 36 sec Integration
How Do I: Change the Appearance of Grouped Data Using Styles 18 min 40 sec Style
How Do I: Apply Textures to a 3D object 24 min 22 sec 3D
How Do I: WinForms WPF Integration 11 min Integration
How Do I: Use Resource Files for Localization both in XAML and Code 25 min 16 sec Localization
How do I: Use Windows 7 Taskbar Progress Reporting from WPF 4 10 min 45 sec Taskbar integration
How Do I: Create Custom Pixel Shader Effects for WPF 28 min 41 sec 3D
How Do I: Work with Lighting in WPF 3D 20 min 26 sec 3D
How Do I: Get Started with 3D Elements in WPF 31 min 39 sec 3D
How Do I: Use ASP.NET Membership Provider for WPF Authentication 25 min 04 sec ASP.NET
How Do I: Use a WPF Control in a Windows Form using ElementHost 06 min 52 sec Integration
How Do I: Create a Custom Command in WPF 18 min 06 sec Commands
How Do I: Custom Easing Functions in WPF 4 16 min 49 sec Easing
Introduction to Easing Functions in WPF 4 15 min 23 sec Easing
Introducing the WPF 4 Calendar Control 17 min 49 sec Controls
How Do I: Use Command Binding in WPF 24 min 18 sec Commands
How Do I: Use CollectionViews to Sort and Filter Data 24 min 23 sec Sort/Filter
How Do I: Control Item Activation By Data Validation? 24 min 43 sec Validation
How Do I: Animate an Effect in WPF? 17 min 52 sec Animation
Building a Client Profile Deployment for photoSuru 09 min 53 sec ??
How Do I: Visually Indicate Binding Error Status 12 min 16 sec Binding
How Do I: Create a Custom Binding Validator 20 min Validation
How Do I: Associate a Validation Rule with a Binding 16 min 53 sec Validation
How Do I: Add Design Time Data to a Control 13 min 48 sec Design
How Do I: Detect Designmode in a Usercontrol 10 min 26 sec Design
Using Alternating Rows in an ItemsControl 14 min 54 sec Controls
Control When Bound Data is Updated 19 min 33 sec Binding
Working With Context Menus in WPF 13 min 5 sec Controls
How Do I: Use the WebBrowser Control in WPF 21 min 25 sec Controls
Adding Annotations to Flow Documents 04 min 35 sec ??
How Do I: Create a Splash Screen in WPF 14 min Getting Started
How Do I: Create a Simple WPF DataGrid to Edit Tabular Data 31 min 3 sec Controls
How Do I: Create a Master-Detail Data Entry Form in WPF 24 min 58 sec Design
How to Use Styles in WPF 10 min 22 sec Style
How to Create a User Control in WPF 11 min 38 sec Controls
How to Create a WPF Application 10 min 19 sec Getting Started
How to Apply Control Templates in WPF 12 min 24 sec Templates
How to Consume a Data Service in WPF 13 min 6 sec Service
How to Use Data Templates in WPF 14 min 59 sec Templates
How to Layout a WPF Application 14 min 5 sec Design
How to Use XAML in WPF 10 min 34 sec XAML
Control Video Playback in WPF 14 min 36 sec Video
Build a Custom GridLength Animation 20 min 18 sec Animation
How Do I: Create a Dynamic Storyboard in WPF 20 min 8 sec Animation
How Do I: Build an Asynchronous Progress Bar in WPF 24 min 48 sec Controls
How Do I: Use Video in WPF Applications 15 min 12 sec Video
How Do I: Paint with Video in WPF 16 min 58 sec Video
How Do I: Hook Up and Display Validation in WPF 22 min 20 sec Validation
How Do I: Create Lookup Combobox in WPF 23 min 43 sec Controls
Responding to Events with SoundPlayerAction 15 min 37 sec Sound
How Do I: Add Sound to a WPF Application 17 min 48 sec Sound
How Do I: Display Data in a List in WPF 11 min 47 sec Controls
How Do I: Create a Simple Data Entry Form in WPF 24 min 32 sec Getting Started
How Do I: Use ResourceDictionary Elements Exported from Expression Design 2 19 min 3 sec Style
Extend Control Functionality Using XAML Attached Properties 23 min 47 sec XAML
How Do I: Use Attached Properties to Store Extra Data in WPF 17 min 16 sec XAML
How Do I: Define and Use Namespaces in WPF 23 min 16 sec Getting Started
How Do I: Customize the Appearance of a ListBox in WPF 16 min 16 sec Style
How Do I: Customize the Appearance of ListBox ListItems in WPF 15 min 2 sec Style
How Do I: Create and Use a Converter to Change DataTypes 19 min 23 sec Binding
How Do I: Build a ValueConverter to Format Bound Data in WPF 17 min 17 sec Binding
How Do I: Use PointAnimation to Animate a Path in WPF 14 min 22 sec Animation
How Do I: Retrieve XML Data From the Server in an XBAP Application 12 min 36 sec Service
How Do I: Using Path Markup Language to Define a Path 21 min 9 sec XAML
Create Dependency Properties in WPF 21 min 23 sec Getting Started
Use PathGeometries in WPF 20 min 32 sec ??
Ink Basics in WPF 09 min 53 sec ??
Confine Animation to a Path 12 min 43 sec Animation
Skinning a WPF Application 21 min 31 sec Style
Use a Control Template to Define a Desired Look 16 min 34 sec Templates
Create User Controls in WPF 12 min 43 sec Controls
Sharing Styles Among Heterogeneous Elements 21 min 31 sec Style
Override a Style for a Local Control’s Property Value in WPF 12 min 34 sec Style
Host a WPF Control in a Win32 Application 19 min 59 sec Integration
Interactivity Through Triggers in WPF Control Templates 15 min 26 sec Triggers
Kerning XAML Animations in WPF 16 min 18 sec Animation
Implementing Data Triggers in WPF 10 min 25 sec Triggers
Complex Logic Using Triggers in WPF 13 min 36 sec Triggers
Basic Animation in WPF Using XAML 19 min 26 sec Animation
Introduction to Themes in WPF 15 min 14 sec Style
Implementing Property Triggers in WPF 13 min 2 sec Triggers
Style Inheritance using BasedOn in WPF 17 min 28 sec Style
Apply Styles in WPF 12 min 40 sec Style
Deploying a Standard WPF Application Using ClickOnce and Visual Studio 16 min 47 sec Deploy
Create and Browse Loose XAML Files 08 min 20 sec XAML
Use the Page Functions to Retrieve Data and Pass it Back to a Previous Page 12 min 22 sec Navigation
Passing Data Between Pages In Navigation Based Applications 08 min 55 sec Navigation
WPF Navigation Application 11 min 33 sec Navigation
Create Gadget Style Windows in WPF 07 min 37 sec Design
Accessing Command Line Parameters 06 min 13 sec Code
How to Use Isolated Storage 10 min 38 sec ??
Build a Standard WPF Application 08 min 25 sec Getting Started
Creating Navigation Applications in WPF 11 min 45 sec Navigation
Reflections in Visual Studio and Blend 14 min 11 sec Code

How to load a ResourceDictionary at Design Time in WPF

I am including my ResourceDictionary files as Content files. Content files means they are not compiled or embedded, but they are loose files on disk.

One issue I need to solve was how to have the Design View in Expression Blend or Visual Studio.

It seems that Expression Blend has a partial solution but it doesn’t work in Visual Studio for me.

Steps for loading a ResourceDictionary from a loose file at design time

  1. Locate your .proj file for your WPF Project.
  2. Edit the .proj file with you favorite text editor.
    Note: I use Notepad++.
  3. Find the ResourceDictionary file that is included as content.
        <Content Include="Resources\en-US\Common.View.LocalizationResources.en-US.xaml">
          <Generator>MSBuild:Compile</Generator>
          <SubType>Designer</SubType>
          <CopyToOutputDirectory>PreserveNewest</CopyToOutputDirectory>
        </Content>
    
  4. Change it to this:
        <Content Include="Resources\en-US\Common.View.LocalizationResources.en-US.xaml"
          Condition="'$(DesignTime)'=='true'
          OR ('$(SolutionPath)'!='' AND Exists('$(SolutionPath)')
          AND '$(BuildingInsideVisualStudio)'!='true'
          AND '$(BuildingInsideExpressionBlend)'!='true')">
          <Generator>MSBuild:Compile</Generator>
          <SubType>Designer</SubType>
          <CopyToOutputDirectory>PreserveNewest</CopyToOutputDirectory>
        </Content>
    
  5. Save and close the file.


Loading multiple ResourceDictionary files at design time

Sometimes Expression Blend will prompt you when it can’t find a resource and it will do this for you. However, it does something interesting.

It adds a file called DesignTimeResources.xaml in the Properties folder as a Page (not as Content).

    <Page Include="Properties\DesignTimeResources.xaml" 
      Condition="'$(DesignTime)'=='true' 
      OR ('$(SolutionPath)'!='' 
      AND Exists('$(SolutionPath)') AND '$(BuildingInsideVisualStudio)'!='true' 
      AND '$(BuildingInsideExpressionBlend)'!='true')">
      <Generator>MSBuild:Compile</Generator>
      <SubType>Designer</SubType>
      <ContainsDesignTimeResources>true</ContainsDesignTimeResources>
    </Page>

The file then looks as follows:

<ResourceDictionary
    xmlns="http://schemas.microsoft.com/winfx/2006/xaml/presentation" 
    xmlns:x="http://schemas.microsoft.com/winfx/2006/xaml">
    <ResourceDictionary.MergedDictionaries>        
        <ResourceDictionary Source="E:\Dev\LD\Trunk\install\Common\LANDesk.Install.Common\Resources\en-US\Common.LocalizationResources.en-US.xaml"/>
    </ResourceDictionary.MergedDictionaries>
    <!-- Resource dictionary entries should be defined here. -->
</ResourceDictionary>

And then you can add more ResourceDictionaries without modifying the .proj file.

<ResourceDictionary
    xmlns="http://schemas.microsoft.com/winfx/2006/xaml/presentation" 
    xmlns:x="http://schemas.microsoft.com/winfx/2006/xaml">
    <ResourceDictionary.MergedDictionaries>
        <ResourceDictionary Source="E:\Dev\LD\Trunk\install\SomeApp\Branding\StyleResources.xaml"/>
        <ResourceDictionary Source="E:\Dev\LD\Trunk\install\SomeApp\Branding\AlternateStyleResources.xaml"/>
        <ResourceDictionary Source="E:\Dev\LD\Trunk\install\SomeApp\Resources\en-US\en-US.xaml"/>
    </ResourceDictionary.MergedDictionaries>
    <!-- Resource dictionary entries should be defined here. -->
</ResourceDictionary>

ResourceDictionary with Relative Paths

Of course relative paths are more desired than static paths, especially when using projects among multiple people and from source control.

<ResourceDictionary
    xmlns="http://schemas.microsoft.com/winfx/2006/xaml/presentation" 
    xmlns:x="http://schemas.microsoft.com/winfx/2006/xaml">
    <ResourceDictionary.MergedDictionaries>
        <ResourceDictionary Source="..\Branding\StyleResources.xaml"/>
        <ResourceDictionary Source="..\Branding\AlternateStyleResources.xaml"/>
        <ResourceDictionary Source="..\Resources\en-US\en-US.xaml"/>
    </ResourceDictionary.MergedDictionaries>
    <!-- Resource dictionary entries should be defined here. -->
</ResourceDictionary>

Resources:
http://www.tweened.org/en/2010/06/07/design-time-resources-dans-blend-4/

A snippet for Properties in a ViewModel

If you are using MVVM you probably should create a snippet very similar to the following to save time.

C:\Program Files (x86)\Microsoft Visual Studio 10.0\VC#\Snippets\1033\Visual C#\propvm.snippet

<?xml version="1.0" encoding="utf-8" ?>
<CodeSnippets  xmlns="http://schemas.microsoft.com/VisualStudio/2005/CodeSnippet">
	<CodeSnippet Format="1.0.0">
		<Header>
			<Title>propvm</Title>
			<Shortcut>propvm</Shortcut>
			<Description>Code snippet for property and backing field for a ViewModel that calls NotifyPropertyChanged.</Description>
			<Author>Jared Barneck</Author>
			<SnippetTypes>
				<SnippetType>Expansion</SnippetType>
			</SnippetTypes>
		</Header>
		<Snippet>
			<Declarations>
				<Literal>
					<ID>type</ID>
					<ToolTip>Property type</ToolTip>
					<Default>int</Default>
				</Literal>
				<Literal>
					<ID>property</ID>
					<ToolTip>Property name</ToolTip>
					<Default>MyProperty</Default>
				</Literal>
			</Declarations>
			<Code Language="csharp"><![CDATA[public $type$ $property$
	{
		get { return _$property$;}
		set 
		{ 
			_$property$ = value;
			NotifyPropertyChanged("$property$");
		}
	} private $type$ _$property$;
	$end$]]>
			</Code>
		</Snippet>
	</CodeSnippet>
</CodeSnippets>

Writing Android apps in C# using MonoDroid

As C# developers, many of us would prefer to write Android Apps in C# as well. Novell had promised us MonoDroid, but we were quite concerned as to whether MonoDroid would ever be released when Novell was dismantled.

However, Xamarin spawned from the ashes like a phoenix to restore the viability of MonoDroid, restoring our hopes to writing in C# for the Android platform.

Though I am hopeful that MonoDroid will become popular allowing C# to be a commonly used language for Android devices, there is still some question as to whether Xamarin and its MonoDroid product will survive.

Xamarin is a new company and needs to survive first. Its business is to sell MonoDroid, which is not open source, but is a proprietary product. Unfortunately, MonoDroid may cost too much, preventing adoption among app developers. Xamarin requires a customer base and a continual adoption rate if it is going to survive. If the company folds, what is going to happen to the library and the apps that use it?

Is Development with MonoDroid Free? Yes and No!

Yes and no.

Yes because anybody can use and develop with MonoDroid at no cost. It isn’t until you need to publish an app to the app store that you need to buy a license. You can use the MonoDroid trial for as long as you want. Here is a quote from the trial website. [2]

The evaluation version of Mono for Android does not expire, but enables development and testing against the Android Emulator only.

No, because you need to buy a license once either of the following become true:

  1. You need to test your code directly on a real device and not just an emulated device
  2. You are ready to publish an app to the app store

So what is the cost of MonoDroid? Depends on if you buy Professional, Enterprise, or Enterprise Priority. On the Xamarin store, the following table can be found. To see it you have to add MonoDroid to your cart and then click the “Show product comparison” link. [1]

Professional Enterprise Enterprise Priority
Deploy to your devices Has this feature Has this feature Has this feature
Publish to app stores Has this feature Has this feature Has this feature
Enterprise distribution Has this feature Has this feature
Priority support queue Has this feature
Guaranteed response time Has this feature
License expiration Never Never Never
Update subscription 1 Year 1 Year 1 Year
License usage Original User Seat Seat
Price (USD) $399 $999 $2,499

These costs are very low for business or enterprise customers who have C# developers and want to write Android apps. The cost of training a C# developer to develop apps for Android in Java may be far greater than training them to develop apps for Android using C# and buying a MonoDroid license.

Is MonoDroid easy to set up?

MonoDroid is simple to set up. Xamarin has some simple steps that can be found on their web site. They have MonoDroid installation instructions for installing MonoDroid for use with any of three environments.

  1. Visual Studio (Important! Visual Studio Express is not supported)
  2. MonoDevelop on Windows
  3. MonoDevelop on Mac OSX

If you don’t have a Visual Studio license and you can’t afford one, then go with MonoDevelop because Visual Studio Express is noted to be enough [3].

However, the Visual Studio install is four simple steps.

  1. Install the Java SDK
  2. Install the Android SDK
  3. Configure your simulator
  4. Install the Mono for Android Visual Studio 2010 Plugin

These are very easy steps to complete, and I won’t repeat the steps here, but once you complete them, you are ready to start writing Android apps in C#.

Once you feel you have everything installed, click the following link to continue reading.

Writing your first MonoDroid project


http://android.xamarin.com/Installation/Windows

Expression Studio Training Videos – A check list of videos from Expression.Microsoft.com

There are a lot of free training videos at the Expression 4 web site. However, this web site has two problems:

  1. The videos aren’t necessarily in order.
  2. There is not defined method to track your learning progress as you watch them.

Well, now it is easy. Just copy and paste this page, or easier, download this Excel document:

Expression Training Videos.xls

You can now track you progress as you self-train and go through the Expression 4 training videos.

Training Subjects


Expression Studio

Introducing Expression 4 (eight videos)
Completed Introduction Videos
Introduction to Expression Studio Ultimate
Introduction to Expression Web
Introduction to Expression Blend
Introduction to SketchFlow, a feature of Expression Studio Ultimate
Introduction to Expression Encoder Pro
Expression Web Demo Overview
Expression Blend and SketchFlow Demo Overview
Expression Encoder Pro Demo Overview
Getting Started with Silverlight – For Designers (eleven video series)
Completed Beginner Videos
What is Silverlight? An Overview
Understanding and Working with XAML Code in Expression Blend
Creating Vector-Based Artwork with Expression Design
Applying Color and Effects to Projects using Expression Design
Organizing Your Project using Layout Containers in Expression Blend
Editing the Appearance of Your Project Items using Expression Blend
Exploring the Objects and Timeline Task Pane in Expression Blend
Customizing Silverlight Video Players using Expression Blend
Optimizing Video for Silverlight Playback using Expression Encoder
Adding Interactivity to Silverlight Projects using Expression Blend
Publishing Silverlight Projects to the Web using Expression Blend
Getting Started with Standards-Based Design (ten video series)
Completed Training
Understanding the Benefits of Standards-Based Design with Expression Web
Styling Text using CSS with Expression Web
Understanding CSS Pseudo Classes for Styling Links using CSS with Expression Web
Understanding CSS Margins and Padding with Expression Web
Using CSS Positioning for Layout with Expression Web
Adding Background Images Using CSS with Expression Web
Using CSS Floats to Create Flexible Page Layouts with Expression Web
Clearing CSS Floats with Expression Web
Adding JavaSript to Your Site with Expression Web
Using External CSS Stylesheets with Expression Web


Prototyping

Additional Expression Blend Training Videos
Download the assets, step-by-step guide, and video package (127MB)
Completed Training
Introducing SketchFlow with Expression Blend 3
Adding Navigation Screens in SketchFlow with Expression Blend 3
Building Basic Layout in SketchFlow with Expression Blend 3
Using SketchStyle Controls to Enhance a SketchFlow Layout with Expression Blend 3
Working with Components in a SketchFlow Project with Expression Blend 3
Adding Navigation to Buttons in SketchFlow with Expression Blend 3
Working with States in SketchFlow with Expression Blend 3
Working with the SketchFlow Animation Panel with Expression Blend 3
Working with Behaviors in SketchFlow with Expression Blend 3
Using Sample Data in SketchFlow with Expression Blend 3
Exporting your SketchFlow project with Expression Blend 3
Adding Feedback and Annotations in the SketchFlow Player with Expression Blend 3


Additional Videos


Additional Expression Blend Training Videos
Completed Training
Displaying Dynamic Content in Silverlight using Expression Blend
Understanding and Managing Silverlight Resources with Expression Blend
Making Silverlight Objects Appear Transparent over HTML using Expression Blend
Creating a Template for a ScrollBar with Expression Blend
Customizing an Expression Encoder Template using Expression Blend
Creating Animated XAML Overlays for Expression Encoder using Expression Blend and Design
Customizing a Silverlight Template with Expression Blend
Customizing the Look of a Radio Button in Expression Blend
Customizing the Look of a Listbox in Expression Blend
Creating a Calculator with Expression Blend
Using Runtime Storyboarding in Expression Blend
Creating User Controls in Expression Blend
Reusing and Customizing User Controls in Expression Blend
Making a Slider Control in Expression Blend
Exploring XAML Layout Controls in Expression Blend
Using the Breadcrumb Trail in Expression Blend
Using Vertex Animation with Expression Blend
Using the Border Control in Expression Blend
Using the GridLayout Panel in Expression Blend
Using the Layout Stack Panel in Expression Blend
Using the Binding Scrollbar in Expression Blend
Creating Visual Transitions in Expression Blend
Use an In-State Animation To Make a Silverlight 2 Button Pulse While Focused
Customize The Check Mark In a Silverlight 2 CheckBox
Add States to a UserControl for Silverlight 2
Create Custom Buttons for Silverlight 2
Create and Edit Clipping Paths in Blend
Use the Key Spline Editor in Blend
Create the Wet Floor Effect in Expression Blend
Customize Expression Media Silverlight Templates Using Blend
Working with 3D Cameras in Expression Blend
Working With 3D Materials in Expression Blend
Importing and Manipulating 3D Objects in Expression Blend
Create User Controls in Expression Blend
Working With Clipping Paths in Expression Blend
Using an ObjectDataSource in Expression Blend
Creating a Control Template in Expression Blend
Introduction to Styles
Using Expression Design to Generate XAML Resources for Expression Blend
Motion Paths
Sharing Styles Among Heterogeneous Elements
Basic Animation
Timeline Interpolation
Working with the Grid Panel
Adding Video
Creating and Using an XMLDataSource
Create Data Templates
Creating and Using Brush Resources in Expression Blend
Introducing Blend and Working with Control Editing
Using Databinding with External Data
3D Animation and Event Triggers
Databinding to Control Properties
Designer and Developer Collaboration and Additional Demos


Beehive Game

Additional Expression Blend Training Videos
Download the assets, step-by-step guide, and video package (104 MB)
Completed Training
Organizing and Importing Assets into Expression Blend 3
Creating the BeeHive Game Interface Using Expression Blend 3
Understanding Layout Containers with Expression Blend 3
Creating a User Control with Expression Blend 3
Adding and Applying Behaviors with Expression Blend 3
Adding Game Walls and Creating Animation with Expression Blend 3
Animating Controls with the Visual State Manager with Expression Blend 3
Working with Text and Embedding Fonts with Expression Blend 3
Adding Audio Resources to a Silverlight Game with Expression Blend 3
Publishing and Testing Your Silverlight Game with Expression Blend 3

Well, once you have gone through all these videos you can probably call yourself trained in Application Design using Expression Studio, SilverLight and WPF.

With these skills expect to make between 40k (0-1 years experience) and 80k (5+ years experience).

How to create a copy of a control’s default style?

Sometimes you need to make some advanced styling changes to a default control, such as a RadioButton, ListBox, DataGrid, Button, etc. However, you may want to keep the majority of the default style the way it is.

In Expression Blend, this is easy to do.  If you don’t have Expression Blend and you are developing in WPF, get it immediately.  There is a trial version you can test out.

Here is how to get your copy of any control’s default style.

  1. Open Expression Blend.
  2. Create a new WPF project. (It is just a temp project.)
  3. Add the default control to your MainWindow.xaml.
  4. Right-click on the control and choose Edit Template | Edit a Copy.
  5. On the Create Style Resource page, click the “New…” button near the bottom right, just to the right of the Resource dictionary option.
  6. In the New Item window, provide a name that is meaningfule.
  7. Click OK to create the file and to return the Create Style Resource page.
  8. Make sure Resource dictionary is selected (it should be) and click OK.

You have now created a copy of the default style of the control.  You now have power to manipulate the control in advanced ways.

Important! Be aware that some controls and made up of other controls, and often you have to do this for each control that your control uses.  For example, a DataGrid has many different subcomponents such as a ScrollViewer, an ItemsPresenter, Grids, etc…

WPF replacement options for an animated gif or How to make a spinner?

Option 1 – Spin an image using a Storyboard

UPDATE: Check out this more recent post: A SpinningImage control in WPF

If your animation is just a single image that moves, such as a spinner, you can use a Storyboard to spin the single image.

Here is a spinner.png file (128×128) that I made really quickly in Paint.NET.

Spinner

  1. Create a default WPF Application project in visual studio.
  2. Add the spinner.png image to the project (or use your own image).
  3. Add a Storyboard to the resources.

Here is the Xaml.

<Window x:Class="SpinAnImage.MainWindow"
        xmlns="http://schemas.microsoft.com/winfx/2006/xaml/presentation"
        xmlns:x="http://schemas.microsoft.com/winfx/2006/xaml"
        Title="MainWindow" Height="300" Width="300">
    <Window.Resources>
        <Storyboard x:Key="Spin360" Storyboard.TargetName="Spinner" Storyboard.TargetProperty="RenderTransform.(RotateTransform.Angle)">
            <DoubleAnimation From="0" To="360" BeginTime="0:0:0" Duration="0:0:2" RepeatBehavior="Forever" />
        </Storyboard>
    </Window.Resources>
    <Grid>
        <Image Name="Spinner" Source="spinner.png" Width="128" Height="128" RenderTransformOrigin="0.5, 0.5">
            <Image.Triggers>
                <EventTrigger RoutedEvent="FrameworkElement.Loaded">
                    <EventTrigger.Actions>
                        <BeginStoryboard Storyboard="{StaticResource Spin360}" />
                    </EventTrigger.Actions>
                </EventTrigger>
            </Image.Triggers>
            <Image.RenderTransform>
                <RotateTransform Angle="0" />
            </Image.RenderTransform>
        </Image>
    </Grid>
</Window>

Here is the simple Visual Studio 2010 project:

SpinAnImage.zip

Option 2 – Loop through images using a Storyboard

This option is the one you would use if you have multiple images. You can create a Storyboard that loops through all of your images. If you have a gif, you can extract each image and use them.

Here is a BlackSpinner1.png file (128×128) that I made really quickly in Paint.NET. Actually I made eight versions of this image, where the section that is gray changes in each image.

Here is how you configure your project to animate through these images.

  1. Create a default WPF Application project in visual studio.
  2. Add a folder to the project called Images.
  3. Add the images you want to loop through to the Images directory.
  4. Add a Storyboard to the resources.

Here is the Xaml.

<Window x:Class="SpinUsingMultipleImages.MainWindow"
        xmlns="http://schemas.microsoft.com/winfx/2006/xaml/presentation"
        xmlns:x="http://schemas.microsoft.com/winfx/2006/xaml"
        Title="Spinner using multiple images" Height="300" Width="300">
    <Grid>
        <Grid.Resources>
            <Storyboard x:Key="BlackSpinnerStoryBoard">
                <ObjectAnimationUsingKeyFrames Duration="0:0:2" Storyboard.TargetProperty="Source" RepeatBehavior="Forever">
                    <DiscreteObjectKeyFrame KeyTime="0:0:0">
                        <DiscreteObjectKeyFrame.Value>
                            <BitmapImage UriSource="Images/BlackSpinner1.png"/>
                        </DiscreteObjectKeyFrame.Value>
                    </DiscreteObjectKeyFrame>
                    <DiscreteObjectKeyFrame KeyTime="0:0:0.25">
                        <DiscreteObjectKeyFrame.Value>
                            <BitmapImage UriSource="Images/BlackSpinner2.png"/>
                        </DiscreteObjectKeyFrame.Value>
                    </DiscreteObjectKeyFrame>
                    <DiscreteObjectKeyFrame KeyTime="0:0:0.50">
                        <DiscreteObjectKeyFrame.Value>
                            <BitmapImage UriSource="Images/BlackSpinner3.png"/>
                        </DiscreteObjectKeyFrame.Value>
                    </DiscreteObjectKeyFrame>
                    <DiscreteObjectKeyFrame KeyTime="0:0:0.75">
                        <DiscreteObjectKeyFrame.Value>
                            <BitmapImage UriSource="Images/BlackSpinner4.png"/>
                        </DiscreteObjectKeyFrame.Value>
                    </DiscreteObjectKeyFrame>
                    <DiscreteObjectKeyFrame KeyTime="0:0:1">
                        <DiscreteObjectKeyFrame.Value>
                            <BitmapImage UriSource="Images/BlackSpinner5.png"/>
                        </DiscreteObjectKeyFrame.Value>
                    </DiscreteObjectKeyFrame>
                    <DiscreteObjectKeyFrame KeyTime="0:0:1.25">
                        <DiscreteObjectKeyFrame.Value>
                            <BitmapImage UriSource="Images/BlackSpinner6.png"/>
                        </DiscreteObjectKeyFrame.Value>
                    </DiscreteObjectKeyFrame>
                    <DiscreteObjectKeyFrame KeyTime="0:0:1.50">
                        <DiscreteObjectKeyFrame.Value>
                            <BitmapImage UriSource="Images/BlackSpinner7.png"/>
                        </DiscreteObjectKeyFrame.Value>
                    </DiscreteObjectKeyFrame>
                    <DiscreteObjectKeyFrame KeyTime="0:0:1.75">
                        <DiscreteObjectKeyFrame.Value>
                            <BitmapImage UriSource="Images/BlackSpinner8.png"/>
                        </DiscreteObjectKeyFrame.Value>
                    </DiscreteObjectKeyFrame>
                </ObjectAnimationUsingKeyFrames>
            </Storyboard>
        </Grid.Resources>
        <Image Name="BlackSpinner">
            <Image.Triggers>
                <EventTrigger RoutedEvent="Image.Loaded">
                    <EventTrigger.Actions>
                        <BeginStoryboard Storyboard="{StaticResource BlackSpinnerStoryBoard}" />
                    </EventTrigger.Actions>
                </EventTrigger>
            </Image.Triggers>
        </Image>
    </Grid>
</Window>

Here is a sample project attached.

SpinUsingMultipleImages.zip

10 Step process for developing a new WPF application the right way using C#

It makes a difference if you do something the right way from the beginning.  Everything seems to work out so much better and takes less time over all.

Here are some basic steps that I have learned will help you do it right the first time. These steps are from my experience, mostly because I did it wrong the first few times.  These are not exact steps. They are subject to change and improve.  In fact, you might have improvements to suggest immediately when you read this. But if you are new to WPF, then reading these steps before you start and following them, will have you closer it doing it the right way the first time.  It is much more pleasant to tweak a pretty good process than it is to go in with no idea for a process and do it wrong.

Step 1 – Prepare the idea

  1. Some one has an idea
  2. Determine the minimal features for release 1.
  3. Determine the minimal features for release 2.
    1. Alter minimal features for release 1 if it makes sense to do so.
  4. Determine the minimal features for release 3.
    1. Alter minimal features for release 1 and 2 if it makes sense to do so.

Step 2 – Design the Application’s back end business logic (simultaneous to Step 3)

  1. Design the backend
  2. Apply the “Keep it simple” idea to the business logic and makes changes as necessary.
  3. Apply the “Keep it secure” idea to the business logic and makes changes as necessary.
  4. Repeats steps 2 and 3 if necessary.
  5. Backend development can start now as the UI and the back end should not need to know about each other.

Step 3 – Design the UI using WPF (simultaneous to Step 2)

  1. Determine what development model should be used to separate the UI from the business logic.
    1. Model-View-ViewModel (MVVM) is the model I recommend for WPF.
    2. Gather libraries used for the model (such as common MVVM libraries that include the common ViewModelBase and RelayCommand objects)
  2. Consider using a 3rd party WPF control set will be used.  Many 3rd party companies provide WPF controls that are better and easier to use than those included by default.
    1. If you decided to use 3rd party controls, purchase or otherwise obtain the libraries for these 3rd party controls.
  3. Consider designing two WPF interfaces or skins (I will call these Views from here on out) for each screen. This will help drive the separation of the back end code from the WPF code. Also if developing two Views is not simple, it indicates a poor design.
  4. Design the interface(s) (you may be doing two Views) using SketchFlow (take time to include the libraries for the 3rd party WPF Controls in your SketchFlow project and design with them)
    1. SketchFlow allows you to design the UI, which is commonly done in paint, but instead does this in XAML, and is actually the WPF code your application will use.
  5. SketchFlow allows you to deliver the design (or both Views if you did two) as a package to the customer.
    1. Deliver it immediately and get feedback.
    2. Make changes suggested by the customer if in scope.
  6. Take time to make the XAML in SketchFlow production ready.
  7. Deliver the XAML to the customer again, to buy of that the design changes are proper.
    1. Make changes suggested by the customer if in scope.

Step 4 – Determine the delivery or install method

  1. Determine the delivery method.
  2. Determine when to develop the delivery method.
    1. The easier the application is, the longer you can wait to determine the installer or delivery method.
    2. The more complex the install or delivery method, the sooner this should be started.

Step 5 – Develop the business logic

  1. Develop the application designed in step 2.
  2. Get the application working without UI or silently. Note: Start the next step, Develop the UI, as soon as enough code is available here.

Step 6 – Develop the UI

  1. Start the UI project by copying the XAML from the SketchFlow document to your Visual Studio or Expression Blend project.
  2. Create a project for the ViewModel code and develop it to interact with the model and business logic using Binding.
  3. Remember to develop two Views for every UI screen as this will help, though not guarantee, that the the MVVM model was correctly used.

Step 7 – Consider a Macintosh version

Macintosh owns a significant market share.  Determine if this application needs to run on Macintosh as well. Sure, since we are running C# your options are limited to either rewriting in objective C and Coca, or using Mono with a MonoMac UI.  I recommend the latter.

Note: It is critical that the UI and business logic are separated to really make this successful.

  1. Completely ignore the WPF design and have Macintosh users users assist the design team in designing the new UI.  Macintosh’s have a different feel, and trying to convert the same UI is a mistake.
  2. Create the MonoMac UI project.
  3. Create a project similar to the ViewModel project in Windows, to link the UI to the business logic.

Step 8 – Consider a BSD/Linux/Unix (BLU) version

BLU (BSD/Linux/Unix) doesn’t exactly own a significant market share. However, it is still important to determine if this application needs to run on on BLU as well. Sure, since we are running C# your options are limited to either rewriting in C++, or using Mono with a GTK# or Forms UI.

  1. Completely ignore the WPF and Macintosh designs and have Linux users assist the design team in designing the new UI. Linux has a different feel, and trying to convert the same UI could be a mistake.
  2. Create the GTK# project.
  3. Create a project similar to the ViewModel project in Windows, to link the UI to the business logic.
  4. GTK# doesn’t support binding, but still keep the UI separate from the business logic as much as possible.

Step 9 – Develop the delivery method

Again, you may need to do this way sooner if the application is complex.

  1. Develop the install or delivery method.
  2. If you decided to deploy to Macintosh or BLU you may have to develop separate install or delivery methods for those platforms as well.

Step 10 – Deliver the finished Products

  1. Once finished, deliver this product.
  2. If you decided to create a Macintosh or BLU version, deliver them when ready as well.  It is OK and maybe preferred to deliver these at different times.

How read the 64 bit registry from a 32 bit application or vice versa

I found out that I needed to read the 64 bit registry from a 32 bit app today.
Why you might ask?
Well, I need to get the RegisteredOrganization value from HKEY_LOCAL_MACHINE\SOFTWARE\Microsoft\Windows NT\CurrentVersion and unfortunately Microsoft has a bug where the WOW6432 version of this key always says Microsoft, so a 32 bit application would always return Microsoft as the RegisteredOrganization, regardless of what the user entered when they installed the OS. This is hardly desired.
Note: This is also why all Visual Studio projects created in Windows 7 64 bit have Microsoft in the project’s Assembly Information. Change the WOW6432 version of the RegisteredOrganization and you fix this Visual Studio issue.
Well, turns out C# doesn’t have functionality until .NET 4, so prior to .NET 4, to choose the 64 bit hive when running a 32 bit app, so we have to do use a DLLImport and use RegOpenKeyEx, RegCloseKey, and RegQueryValueEx.
I don’t have this well commented, and it is not very newbie proof, but here are three different ways to do this. Hopefully you can understand one or more of these.

Example 1 – .NET 4 Example

Here is how to do this in .NET 4.
using Microsoft.Win32;

namespace Read64bitRegistryFrom32bitApp
{
    class Program
    {
        static void Main(string[] args)
        {
            string value64 = string.Empty;
            string value32 = string.Empty;

            RegistryKey localKey = RegistryKey.OpenBaseKey(Microsoft.Win32.RegistryHive.LocalMachine, RegistryView.Registry64);
            localKey = localKey.OpenSubKey(@"SOFTWARE\Microsoft\Windows NT\CurrentVersion");
            if (localKey != null)
            {
                value64 = localKey.GetValue("RegisteredOrganization").ToString();
            }
            RegistryKey localKey32 = RegistryKey.OpenBaseKey(Microsoft.Win32.RegistryHive.LocalMachine, RegistryView.Registry32);
            localKey32 = localKey32.OpenSubKey(@"SOFTWARE\Microsoft\Windows NT\CurrentVersion");
            if (localKey32 != null)
            {
                value32 = localKey32.GetValue("RegisteredOrganization").ToString();
            }
        }
    }
}

.NET 3.5 SP1 and Prior

This can also be done in .NET 3.5 and prior but it is not easy.
We have to do use a DLLImport and use RegOpenKeyEx, RegCloseKey, and RegQueryValueEx. Here are some examples.

Example 1 – A console application to read the 64 bit registry from a 32 bit application or vice versa

Here is the code in a simple one file project:
using System;
using System.Runtime.InteropServices;
using System.Text;

namespace Read64bitRegistryFrom32bitApp
{
    class Program
    {
        static void Main(string[] args)
        {
            string value64 = GetRegKey64(RegHive.HKEY_LOCAL_MACHINE, @"SOFTWARE\Microsoft\Windows NT\CurrentVersion", "RegisteredOrganization");
            Console.WriteLine(value64);
            string value32 = GetRegKey32(RegHive.HKEY_LOCAL_MACHINE, @"SOFTWARE\Microsoft\Windows NT\CurrentVersion", "RegisteredOrganization");
            Console.WriteLine(value32);
        }

        public enum RegSAM
        {
            QueryValue = 0x0001,
            SetValue = 0x0002,
            CreateSubKey = 0x0004,
            EnumerateSubKeys = 0x0008,
            Notify = 0x0010,
            CreateLink = 0x0020,
            WOW64_32Key = 0x0200,
            WOW64_64Key = 0x0100,
            WOW64_Res = 0x0300,
            Read = 0x00020019,
            Write = 0x00020006,
            Execute = 0x00020019,
            AllAccess = 0x000f003f
        }

        public static UIntPtr HKEY_LOCAL_MACHINE = new UIntPtr(0x80000002u);
        public static UIntPtr HKEY_CURRENT_USER = new UIntPtr(0x80000001u);

        #region Member Variables
        #region Read 64bit Reg from 32bit app
        [DllImport("Advapi32.dll")]
        static extern uint RegOpenKeyEx(
            UIntPtr hKey,
            string lpSubKey,
            uint ulOptions,
            int samDesired,
            out int phkResult);

        [DllImport("Advapi32.dll")]
        static extern uint RegCloseKey(int hKey);

        [DllImport("advapi32.dll", EntryPoint = "RegQueryValueEx")]
        public static extern int RegQueryValueEx(
            int hKey, string lpValueName,
            int lpReserved,
            ref uint lpType,
            System.Text.StringBuilder lpData,
            ref uint lpcbData);
        #endregion
        #endregion

        #region Functions
        static public string GetRegKey64(UIntPtr inHive, String inKeyName, String inPropertyName)
        {
            return GetRegKey64(inHive, inKeyName, RegSAM.WOW64_64Key, inPropertyName);
        }

        static public string GetRegKey32(UIntPtr inHive, String inKeyName, String inPropertyName)
        {
            return GetRegKey64(inHive, inKeyName, RegSAM.WOW64_32Key, inPropertyName);
        }

        static public string GetRegKey64(UIntPtr inHive, String inKeyName, RegSAM in32or64key, String inPropertyName)
        {
            //UIntPtr HKEY_LOCAL_MACHINE = (UIntPtr)0x80000002;
            int hkey = 0;

            try
            {
                uint lResult = RegOpenKeyEx(RegHive.HKEY_LOCAL_MACHINE, inKeyName, 0, (int)RegSAM.QueryValue | (int)in32or64key, out hkey);
                if (0 != lResult) return null;
                uint lpType = 0;
                uint lpcbData = 1024;
                StringBuilder AgeBuffer = new StringBuilder(1024);
                RegQueryValueEx(hkey, inPropertyName, 0, ref lpType, AgeBuffer, ref lpcbData);
                string Age = AgeBuffer.ToString();
                return Age;
            }
            finally
            {
                if (0 != hkey) RegCloseKey(hkey);
            }
        }
        #endregion
    }
}

Example 2 – A static class to read the 64 bit registry from a 32 bit application or vice versa

Or if you want this in its own separate class, here is a static class you can add to your project.
using System;
using System.Runtime.InteropServices;
using System.Text;

namespace Read64bitRegistryFrom32bitApp
{
    public enum RegSAM
    {
        QueryValue = 0x0001,
        SetValue = 0x0002,
        CreateSubKey = 0x0004,
        EnumerateSubKeys = 0x0008,
        Notify = 0x0010,
        CreateLink = 0x0020,
        WOW64_32Key = 0x0200,
        WOW64_64Key = 0x0100,
        WOW64_Res = 0x0300,
        Read = 0x00020019,
        Write = 0x00020006,
        Execute = 0x00020019,
        AllAccess = 0x000f003f
    }

    public static class RegHive
    {
        public static UIntPtr HKEY_LOCAL_MACHINE = new UIntPtr(0x80000002u);
        public static UIntPtr HKEY_CURRENT_USER = new UIntPtr(0x80000001u);
    }

    public static class RegistryWOW6432
    {
        #region Member Variables
        #region Read 64bit Reg from 32bit app
        [DllImport("Advapi32.dll")]
        static extern uint RegOpenKeyEx(
            UIntPtr hKey,
            string lpSubKey,
            uint ulOptions,
            int samDesired,
            out int phkResult);

        [DllImport("Advapi32.dll")]
        static extern uint RegCloseKey(int hKey);

        [DllImport("advapi32.dll", EntryPoint = "RegQueryValueEx")]
        public static extern int RegQueryValueEx(
            int hKey, string lpValueName,
            int lpReserved,
            ref uint lpType,
            System.Text.StringBuilder lpData,
            ref uint lpcbData);
        #endregion
        #endregion

        #region Functions
        static public string GetRegKey64(UIntPtr inHive, String inKeyName, String inPropertyName)
        {
            return GetRegKey64(inHive, inKeyName, RegSAM.WOW64_64Key, inPropertyName);
        }

        static public string GetRegKey32(UIntPtr inHive, String inKeyName, String inPropertyName)
        {
            return GetRegKey64(inHive, inKeyName, RegSAM.WOW64_32Key, inPropertyName);
        }

        static public string GetRegKey64(UIntPtr inHive, String inKeyName, RegSAM in32or64key, String inPropertyName)
        {
            //UIntPtr HKEY_LOCAL_MACHINE = (UIntPtr)0x80000002;
            int hkey = 0;

            try
            {
                uint lResult = RegOpenKeyEx(RegHive.HKEY_LOCAL_MACHINE, inKeyName, 0, (int)RegSAM.QueryValue | (int)in32or64key, out hkey);
                if (0 != lResult) return null;
                uint lpType = 0;
                uint lpcbData = 1024;
                StringBuilder AgeBuffer = new StringBuilder(1024);
                RegQueryValueEx(hkey, inPropertyName, 0, ref lpType, AgeBuffer, ref lpcbData);
                string Age = AgeBuffer.ToString();
                return Age;
            }
            finally
            {
                if (0 != hkey) RegCloseKey(hkey);
            }
        }
        #endregion

        #region Enums
        #endregion
    }
}
Here is an example of using this class.
using System;
using System.Runtime.InteropServices;
using System.Text;

namespace Read64bitRegistryFrom32bitApp
{
    class Program
    {
        static void Main(string[] args)
        {
            string value64 = RegistryWOW6432.GetRegKey64(RegHive.HKEY_LOCAL_MACHINE, @"SOFTWARE\Microsoft\Windows NT\CurrentVersion", "RegisteredOrganization");
            string value32 = RegistryWOW6432.GetRegKey32(RegHive.HKEY_LOCAL_MACHINE, @"SOFTWARE\Microsoft\Windows NT\CurrentVersion", "RegisteredOrganization");
        }
    }
}

Example 3 – Adding extension methods to the managed RegistryKey object that read the 64 bit registry from a 32 bit application or vice versa

You know what else is a cool idea? Making it an extension class to the normal managed registry C# code. So you can create a regular managed RegistryKey and then just call an extension function off it.
using System;
using System.Runtime.InteropServices;
using System.Text;
using Microsoft.Win32;

namespace Read64bitRegistryFrom32bitApp
{
    /// &lt;summary&gt;
    /// An extension class to allow a registry key to allow it to get the
    /// registry in the 32 bit (Wow6432Node) or 64 bit regular registry key
    /// &lt;/summary&gt;
    public static class RegistryWOW6432
    {
        #region Member Variables
        #region Read 64bit Reg from 32bit app
        public static UIntPtr HKEY_LOCAL_MACHINE = new UIntPtr(0x80000002u);
        public static UIntPtr HKEY_CURRENT_USER = new UIntPtr(0x80000001u);

        [DllImport("Advapi32.dll")]
        static extern uint RegOpenKeyEx(
            UIntPtr hKey,
            string lpSubKey,
            uint ulOptions,
            int samDesired,
            out int phkResult);

        [DllImport("Advapi32.dll")]
        static extern uint RegCloseKey(int hKey);

        [DllImport("advapi32.dll", EntryPoint = "RegQueryValueEx")]
        public static extern int RegQueryValueEx(
            int hKey, string lpValueName,
            int lpReserved,
            ref uint lpType,
            System.Text.StringBuilder lpData,
            ref uint lpcbData);
        #endregion
        #endregion

        #region Functions
        public static string GetRegKey64(this RegistryKey inKey, String inPropertyName)
        {
            string strKey = inKey.ToString();
            string regHive = strKey.Split('\\')[0];
            string regPath = strKey.Substring(strKey.IndexOf('\\') +1);
            return GetRegKey64(GetRegHiveFromString(regHive), regPath, RegSAM.WOW64_64Key, inPropertyName);
        }

        public static string GetRegKey32(this RegistryKey inKey, String inPropertyName)
        {
            string strKey = inKey.ToString();
            string regHive = strKey.Split('\\')[0];
            string regPath = strKey.Substring(strKey.IndexOf('\\') + 1);
            return GetRegKey64(GetRegHiveFromString(regHive), regPath, RegSAM.WOW64_32Key, inPropertyName);
        }

        private static UIntPtr GetRegHiveFromString(string inString)
        {
            if (inString == "HKEY_LOCAL_MACHINE")
                return HKEY_LOCAL_MACHINE;
            if (inString == "HKEY_CURRENT_USER")
                return HKEY_CURRENT_USER;
            return UIntPtr.Zero;
        }

        static public string GetRegKey64(UIntPtr inHive, String inKeyName, RegSAM in32or64key, String inPropertyName)
        {
            //UIntPtr HKEY_LOCAL_MACHINE = (UIntPtr)0x80000002;
            int hkey = 0;

            try
            {
                uint lResult = RegOpenKeyEx(inHive, inKeyName, 0, (int)RegSAM.QueryValue | (int)in32or64key, out hkey);
                if (0 != lResult) return null;
                uint lpType = 0;
                uint lpcbData = 1024;
                StringBuilder AgeBuffer = new StringBuilder(1024);
                RegQueryValueEx(hkey, inPropertyName, 0, ref lpType, AgeBuffer, ref lpcbData);
                string Age = AgeBuffer.ToString();
                return Age;
            }
            finally
            {
                if (0 != hkey) RegCloseKey(hkey);
            }
        }
        #endregion

        #region Enums
        public enum RegSAM
        {
            QueryValue = 0x0001,
            SetValue = 0x0002,
            CreateSubKey = 0x0004,
            EnumerateSubKeys = 0x0008,
            Notify = 0x0010,
            CreateLink = 0x0020,
            WOW64_32Key = 0x0200,
            WOW64_64Key = 0x0100,
            WOW64_Res = 0x0300,
            Read = 0x00020019,
            Write = 0x00020006,
            Execute = 0x00020019,
            AllAccess = 0x000f003f
        }
        #endregion
    }
}
Here is an example of using these extension functions.
using System;
using System.Runtime.InteropServices;
using System.Text;
using Microsoft.Win32;

namespace Read64bitRegistryFrom32bitApp
{
    class Program
    {
        static void Main(string[] args)
        {
            string value64 = string.Empty;
            string value32 = string.Empty;
            RegistryKey localKey = Registry.LocalMachine;
            localKey = localKey.OpenSubKey(@"SOFTWARE\Microsoft\Windows NT\CurrentVersion");
            if (localKey != null)
            {
                value32 = localKey.GetRegKey32("RegisteredOrganization");
                value64 = localKey.GetRegKey64("RegisteredOrganization");
            }
        }
    }
}
If anything is confusing please comment.
Resources:
  • RegOpenKeyEx Function – http://msdn.microsoft.com/en-us/library/ms724897%28v=VS.85%29.aspx
  • RegQueryValueEx Function – http://msdn.microsoft.com/en-us/library/ms724911%28VS.85%29.aspx
  • http://www.pinvoke.net/default.aspx/advapi32/RegQueryValueEx.html
  • http://www.pinvoke.net/default.aspx/advapi32/RegOpenKeyEx.html
  • http://www.pinvoke.net/default.aspx/advapi32/RegCreateKeyEx.html
  • http://www.pinvoke.net/default.aspx/advapi32/RegCloseKey.html
  • http://stackoverflow.com/questions/1470770/accessing-registry-using-net
  • http://connect.microsoft.com/VisualStudio/feedback/details/400597/registeredorganization-reg-key-on-x64-vista-7

Copyright ® Rhyous.com – Linking to this post is allowed without permission and as many as ten lines of this page can be used along with this link. Any other use of this page is allowed only by permission of Rhyous.com.